ShinyProxy vs Posit Connect: Benchmark Test for Scaling Shiny Apps

Shiny is a web framework for R (and now Python) users. With it, you can build a working dashboard for your analytics in a relatively short time. While it is easy to start developing dashboards without programming experience, the challenge comes with scaling. The quality and interactive method of data delivery will mean greater adoption and more users.
There are many solutions to optimize dashboard performance for a single user. This includes examples like promises for non-blocking access and profvis to identify bottlenecks. However, to scale a Shiny application for a large number of users, the deployment environment plays a significant role.
The two main scalable hosting solutions are Posit Connect (formerly RStudio Connect) and ShinyProxy. The scope of this article is to touch on the two most common scaling solutions for enterprises and why we recommend Connect to enterprise users.
Table of Contents:
- ShinyProxy benefits and costs
- Posit Connect benefits and costs
- Benchmark Test – ShinyProxy vs Connect
- Memory used
- Memory + SWAP used
- CPU usage
- Test summary
- How to migrate from ShinyProxy to Posit Connect
This article was co-authored by Appsilon R/Shiny Developers Janith Wanniarachchi and Fabian Hee. The benchmark comparison was created and run by Appsilon R/Shiny Developer Rodrigo Basa. The re-test was run by Appsilon R/Shiny Developer Leszek Siemiński.
Addendum at bottom – Retest for ShinyProxy proxy.default-max-instances
In our initial research, we used a method that we want to expand on. This article has been updated with results from additional experiments. In ShinyProxy version 2.6.0, users are able to run multiple instances of an app. In our initial test, we did not permit ShinyProxy to run with additional containers, potentially inhibiting performance and creating unbalanced outcomes. In subsequent tests, proxy.default_max_instances (+5) did not significantly improve the performance compared to the original test. Test results are included in the text.
Note: Appsilon is a Certified Posit Partner. While we do promote the usage of Posit products and services when appropriate, we want to remain transparent to our readers as we explore innovative solutions on our blog and limit biases. As per our Code of Conduct, we respect science; we crave the truth with open minds.
<div id="proxy"></div>
ShinyProxy vs Posit Connect – Which solution should I choose?
What is Posit Connect
Posit Connect is a standalone publishing platform for conveniently sharing Shiny applications and other content such as R Markdown documents, Plumber APIs, Python Jupyter notebooks, Quarto documents and projects, or any static R plot or graph made within your organization.
On Posit Connect, you can have multiple R processes per app. This means that many concurrent users can be distributed between separate processes and are served more efficiently. As there is no limitation on the number of processes, you can make use of all your machine resources.
What is ShinyProxy
ShinyProxy architecture is based on docker containers, which isolate the app’s environment. Every user of ShinyProxy will use a private Docker container when running a Shiny application. This can have a significant effect on resources. We’ll cover this in the experiment below and explain the procedure for you to replicate. In addition, the dependency on Docker images means to deploy your Shiny apps, you will need to build your own Docker image for the app. Posit Connect provides push-button deployments from RStudio and the command line without the need for Docker knowledge.
Another key difference between ShinyProxy and Posit Connect is the price. ShinyProxy is free and open-source while Posit Connect is a commercial enterprise solution with a license fee.
[block quote for Posit shinyapps.io and shinyserver]
To make the right choice for the deployment environment that will satisfy your project needs let’s start by comparing the pros and cons of the two solutions.
ShinyProxy benefits
- Open source – no subscription fee
- A wide range of Authorization options available (LDAP / Kerberos / SSO / SAML / Open ID / Keycloak / Social Media / Simple (flat file of users & passwords))
ShinyProxy costs
- Higher implementation cost
- Product support unclear *
- The additional cost of post-implementation support
- The additional layer of complexity – Docker/Kubernetes
- Long-term maintenance requiring a large workforce
*The creator of ShinyProxy, Open Analytics, does offer commercial support, but at the time of writing, we were unable to confirm agreement guarantees.
Posit Connect benefits
- Stability with Software licensing and Standard Software Support from Posit included
- Lower implementation costs
- Easier configuration and deployment of dashboard versions
- Authorization is included in the Posit Connect Subscription, with a wide range of options to choose from: (LDAP and Active Directory / SAML / OAuth 2.0 using Google Apps accounts / PAM / Proxied Authentication / SLA)
- Easier maintenance in production
- Option to add Posit Workbench and Package Manager
- Automatic scaling – no need to manually trigger new processes
- An industry standard by Fortune 500 companies working with R
- Admin panel to manage users and monitor the logs and machine
- Ability to deploy R/Python applications, R/Python API, RMarkdown reports that regenerate automatically, etc.
Posit Connect cost
- A yearly Posit Connect subscription starts at $14,995/year (USD)
In short, ShinyProxy is free, and Posit Connect is expensive – at the start. However, the costs of technology, workforce and maintenance of ShinyProxy may offset any initial savings. If project longevity, scalability, and secured support are your primary concerns, Connect will bring you peace of mind.
Working in distributed teams can be a challenge. Discover the benefits of Posit Connect for distributed teams.
In terms of stability and accountability, ShinyProxy’s open-source implementation comes as a double-edged sword. You might not be getting any guaranteed official product support but since it is open source, investigating and fixing an issue is supported by your team’s capabilities.
The question then becomes how scalable and robust the applications are when hosted on either solution.
<div id="connect"></div>
ShinyProxy vs Connect Benchmark Comparison
To find the answer to that question, let’s perform a benchmark test to compare the scalability and performance of both products. To simulate a simple Shiny application with minimal dependencies the 01_hello dependencies example Shiny application (shiny::runExample("01_hello")) will be used.
To analyze the results of the experiment we consider the following three evaluation measures.
- Memory used
- Memory + Swap used
- CPU Usage
We used percentage values on measured results for clarity.
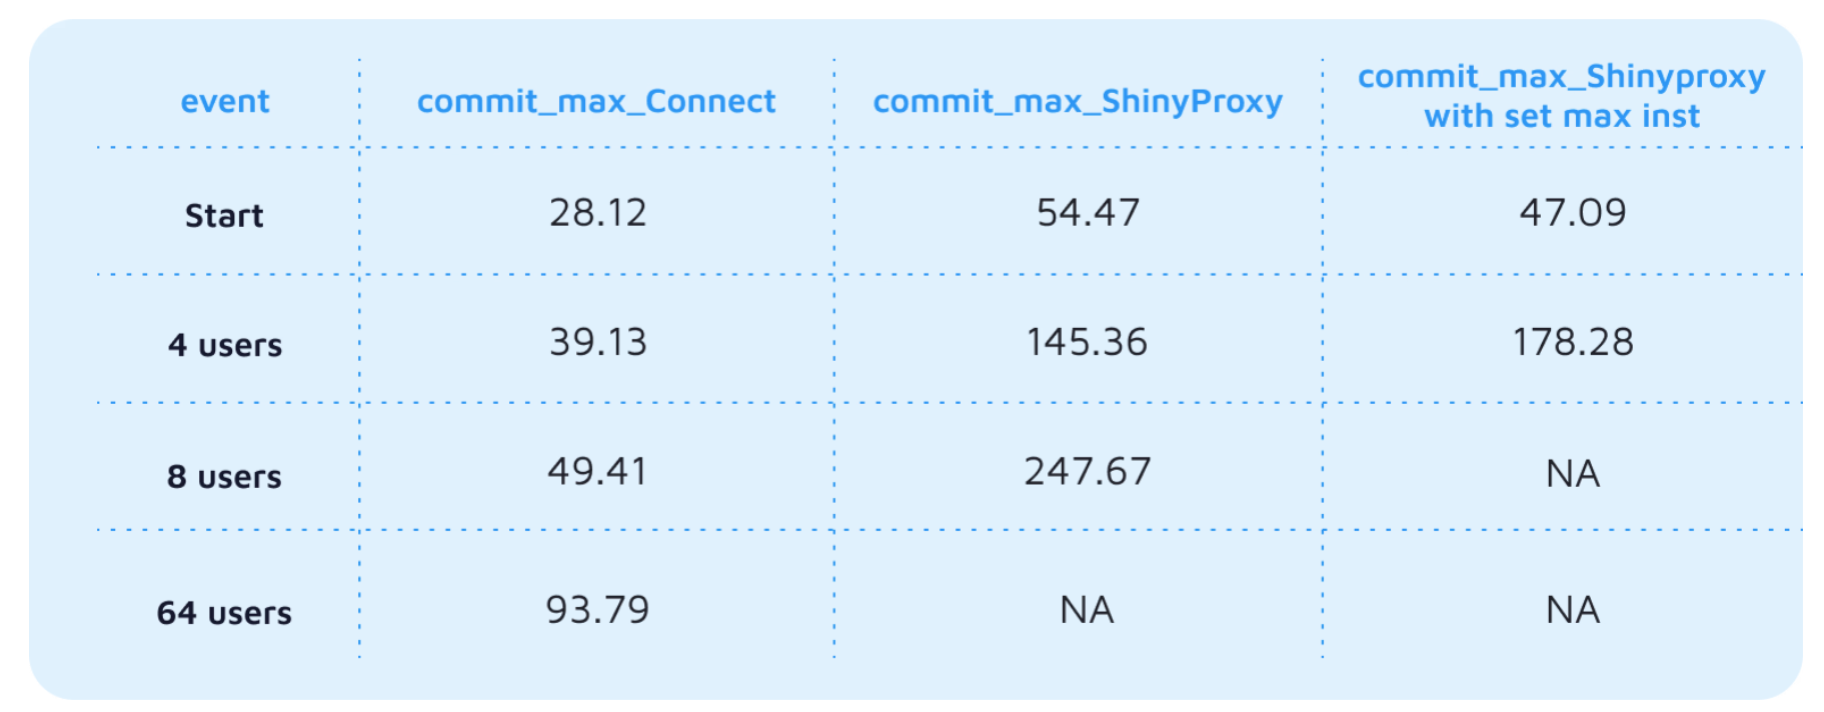
We include two ShinyProxy configurations (ShinyProxy version used: 2.6.1.):
- Default single instance
- “[measure]_Shinyproxy”
- Multiple instances set to proxy.default-max-instances: 5
- “[measure]_Shinyproxy with set max inst”
Testing environment
Both products (ShinyProxy configurations and Connect) were tested on two t3.medium EC2 AWS instances each with 2 vCPU, 4 GB RAM with R-base 4.1.3 in an Ubuntu 20.04 LTS operating system used for the experiment.
Retesting with proxy.default-max-instances occurred under the same environmental conditions.
Product setup
Both installations of ShinyProxy and Posit Connect were performed based on their respective documentation.
ShinyProxy (single) setup
The initial ShinyProxy installation did not have any additional load balancers installed. The default application.yml for openanalytics/shinyproxy-demo was used with a few changes.
- Authentication was set to “none”
- The 06_tabsets application was disabled
ShinyProxy with proxy.default-max-instances: 5 setup
The setup follows the same documentation and setup as above, with one key difference: an additional parameter proxy.default-max-instances set to +5. The purpose of the multiple instances was to identify the influence on performance as it relates to Connect configuration (max processes). With this additional test, we can compare default configurations for both products as well as the recent ShinyProxy update (2.6.0) permitting multiple instances; a ‘somewhat closer comparison to Connect.
Posit Connect setup
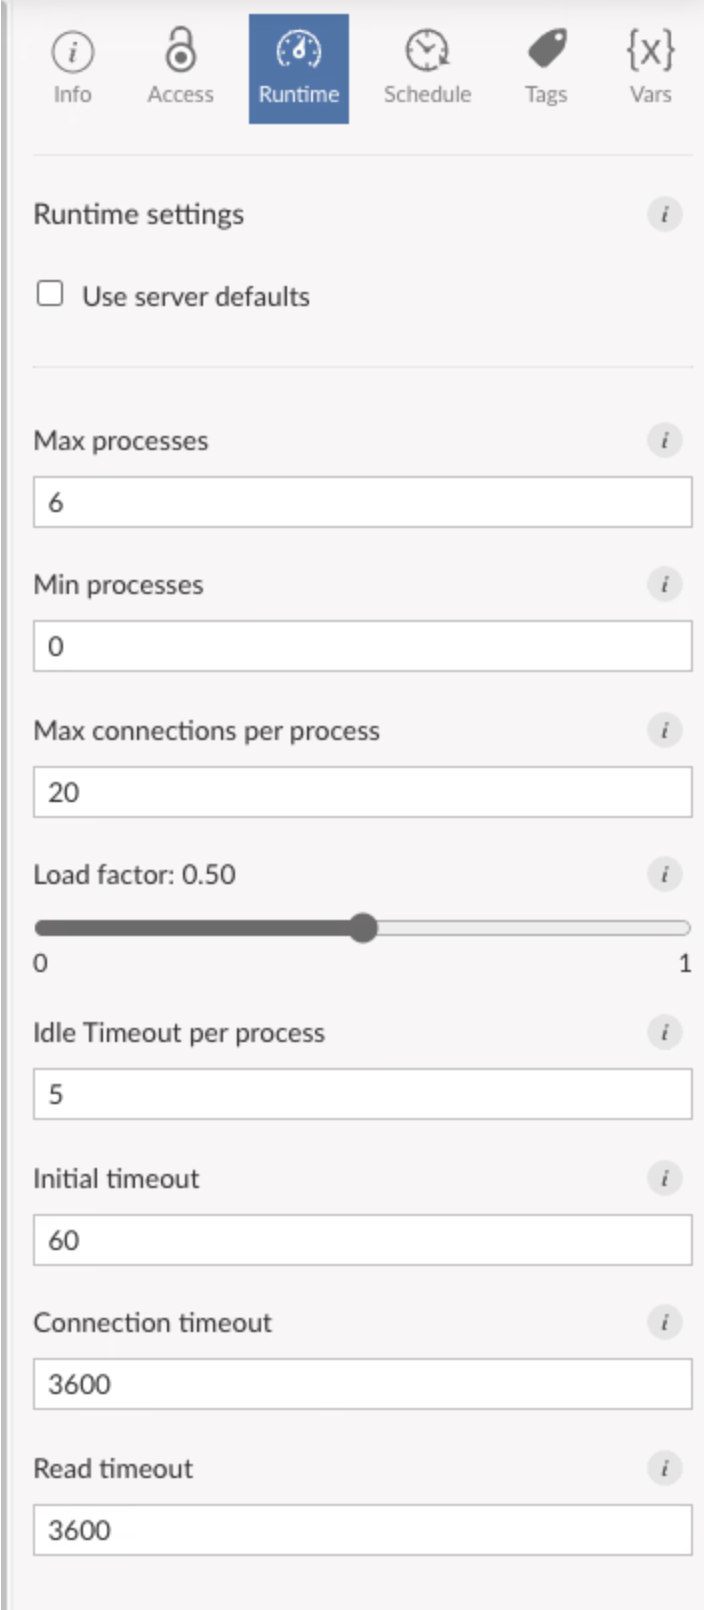
The Posit Connect instance was deployed on the VM by using the web-based UI (Setup Assistance) For the Connect app configuration, other than max processes which were increased from the default of 3 to 6 to accommodate 64 concurrent users, all other settings were left at their default values. Connect was able to handle 32 concurrent users with 3 max processes.
Monitoring tools setup The sar tool contained in the sysstat performance monitoring package in Linux was used to log the system statistics. Specifically, the command sar -r -u 5 was used to capture both the CPU usage and memory usage every 5 seconds.
Additional note: The browser-based Setup Assistant made it easy to install Connect. A manual installation process is also available for automated scripts.
From Connect User Documentation
- Max processes: The maximum number of processes that will be simultaneously running for this content per RStudio Connect node, regardless of load.
- Min processes: The minimum number of processes that will be kept running for this content per RStudio Connect node, regardless of load.
- Max connections per process: The maximum number of client connections allowed to an individual process. Incoming connections which will exceed this limit are routed to a new process or rejected.
- Load factor: A value between 0 and 1 which determines how lazily additional processes will be spawned to handle the incoming load for this process. At the highest setting, Connect will only spawn additional processes when existing processes are not allowed to accept an additional connection. At the lowest setting, Connect will create many new processes as new users arrive to handle the load.
Shiny app deployment
Deploying to ShinyProxy:
- Build your app.
- Build a Docker image for the app.
- Import the Docker image into the Docker instance on the server.
- Modify shinyproxy/application.yml.
- Restart Shinyproxy service.
Deploying to Connect:
- Build your app.
- Click Publish.
Load testing procedure
At the beginning of the test procedure, the sar command would start logging the performance for around 60 seconds to get a baseline reading of the number of resources needed when the servers have not started. Afterward, the installed servers were restarted to get a fresh start.
Assuming that the servers would be at an idle state after 60 seconds, we would wait for 60 seconds before starting the load testing procedure. While the apps are settling the sar command will be logging performance measurements behind the scenes.
Before the start of the test, to perform a load test on the same application on both products, the >shinyloadtest package was used. For the load test using the shinyloadtest package, a recording was made of user interactions to be simulated by a large number of concurrent users. The recording consisted of a user loading the app and clicking on four values of 11, 41, 1, and 50 consecutively.
Once the recording had been captured, the shinycannon command was used to run a load test with the required number of workers and maintains a 1-minute load when all workers are running. For example to run a load test with 8 workers the command would be as follows,
For ShinyProxy the number of workers would take the value of 1, 2, 4, and 8 while the number of workers for Connect would go beyond 8 to 16, 32, and 64. The reasoning for this choice is that the Shinyproxy solution crashed the server with 12 concurrent users and therefore increasing the number of users even further seemed unnecessary.
Clean up
After each load test, the servers would be stopped and the RAM cleared to give a fresh slate.
If you want to run the experiment for yourself refer to the Github Repository.
<div id="test"></div>
ShinyProxy vs Connect benchmark results
As mentioned earlier in the experimental setup, the ShinyProxy solution crashed the server with 12 concurrent users and ShinyProxy with proxy.default-max-instances: 5 crashed the server with 8 concurrent users. Posit Connect was able to handle 64 concurrent users with spare resources.
Posit Connect is the clear winner here.
<div id="mem"></div>
Memory used
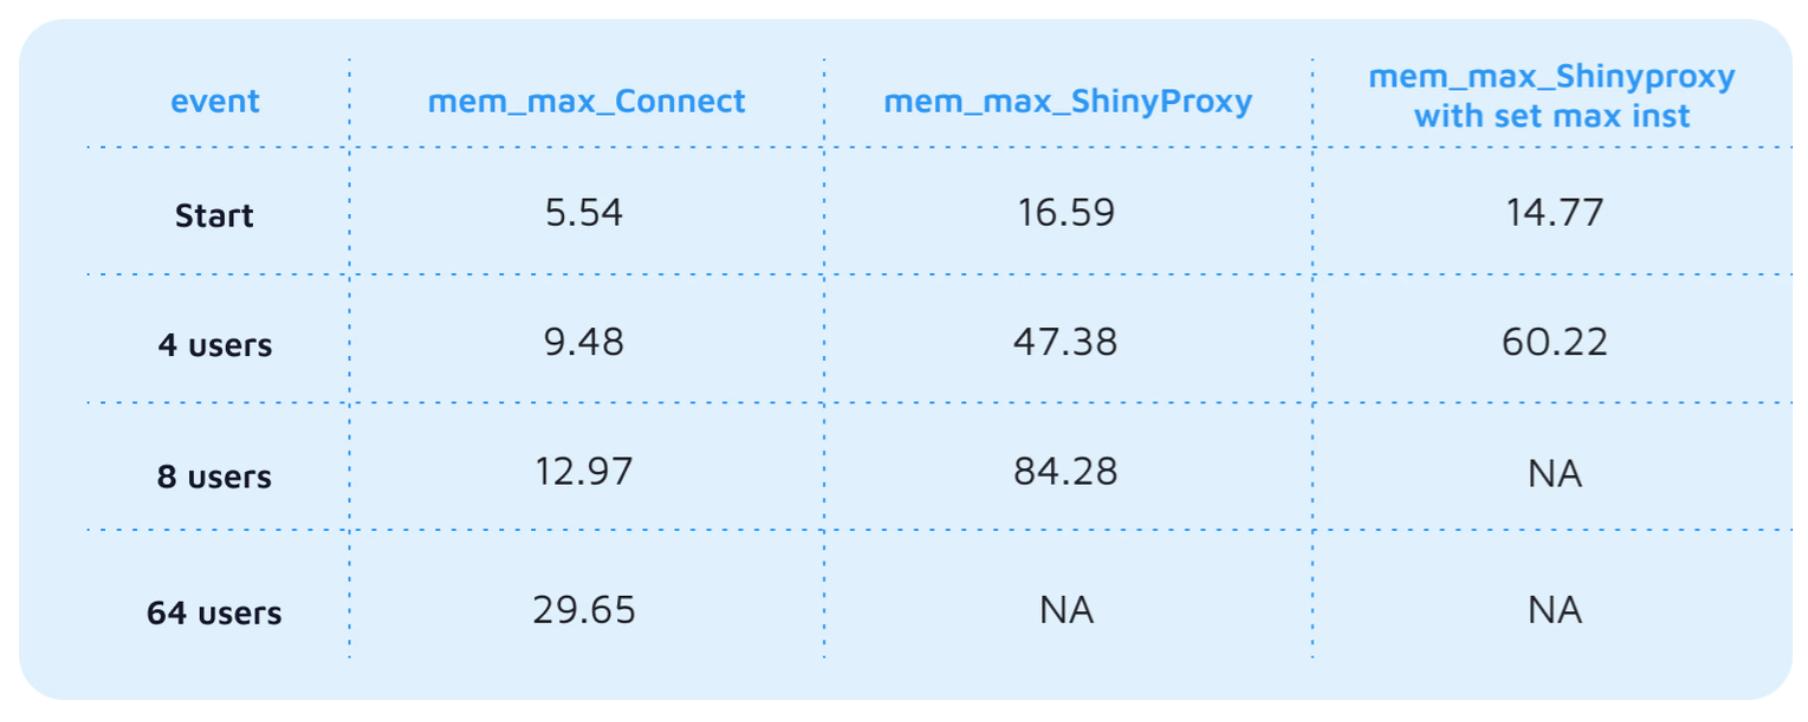
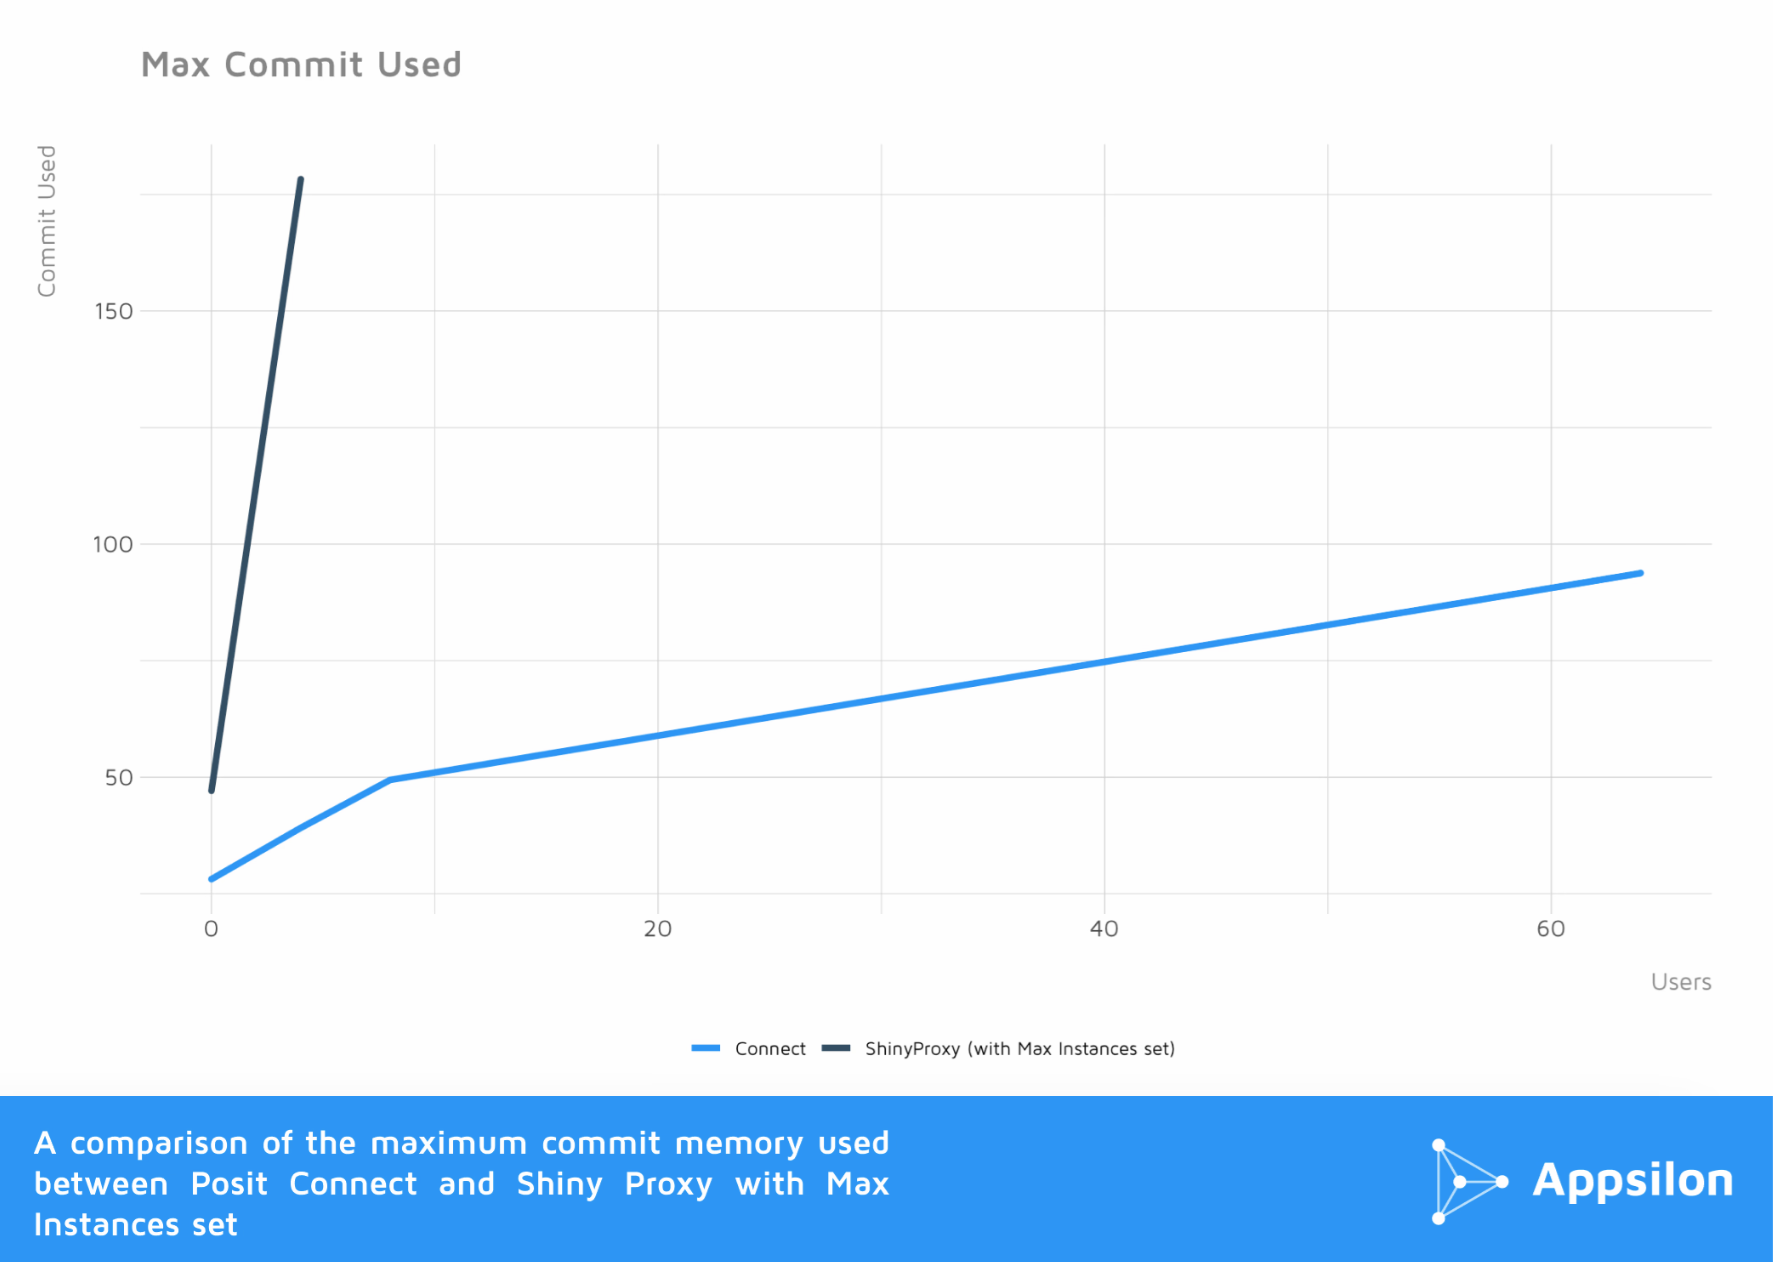
Since Shinyproxy launches one instance of a Docker image for each user, the memory usage of ShinyProxy grows linearly with each increment of concurrent users. Posit Connect also tends to follow a pattern of stabilizing memory usage followed by an increase in memory usage, which would indicate instances where a new worker process was spawned to cater to the increase in the number of users.
Default ShinyProxy config vs Posit Connect
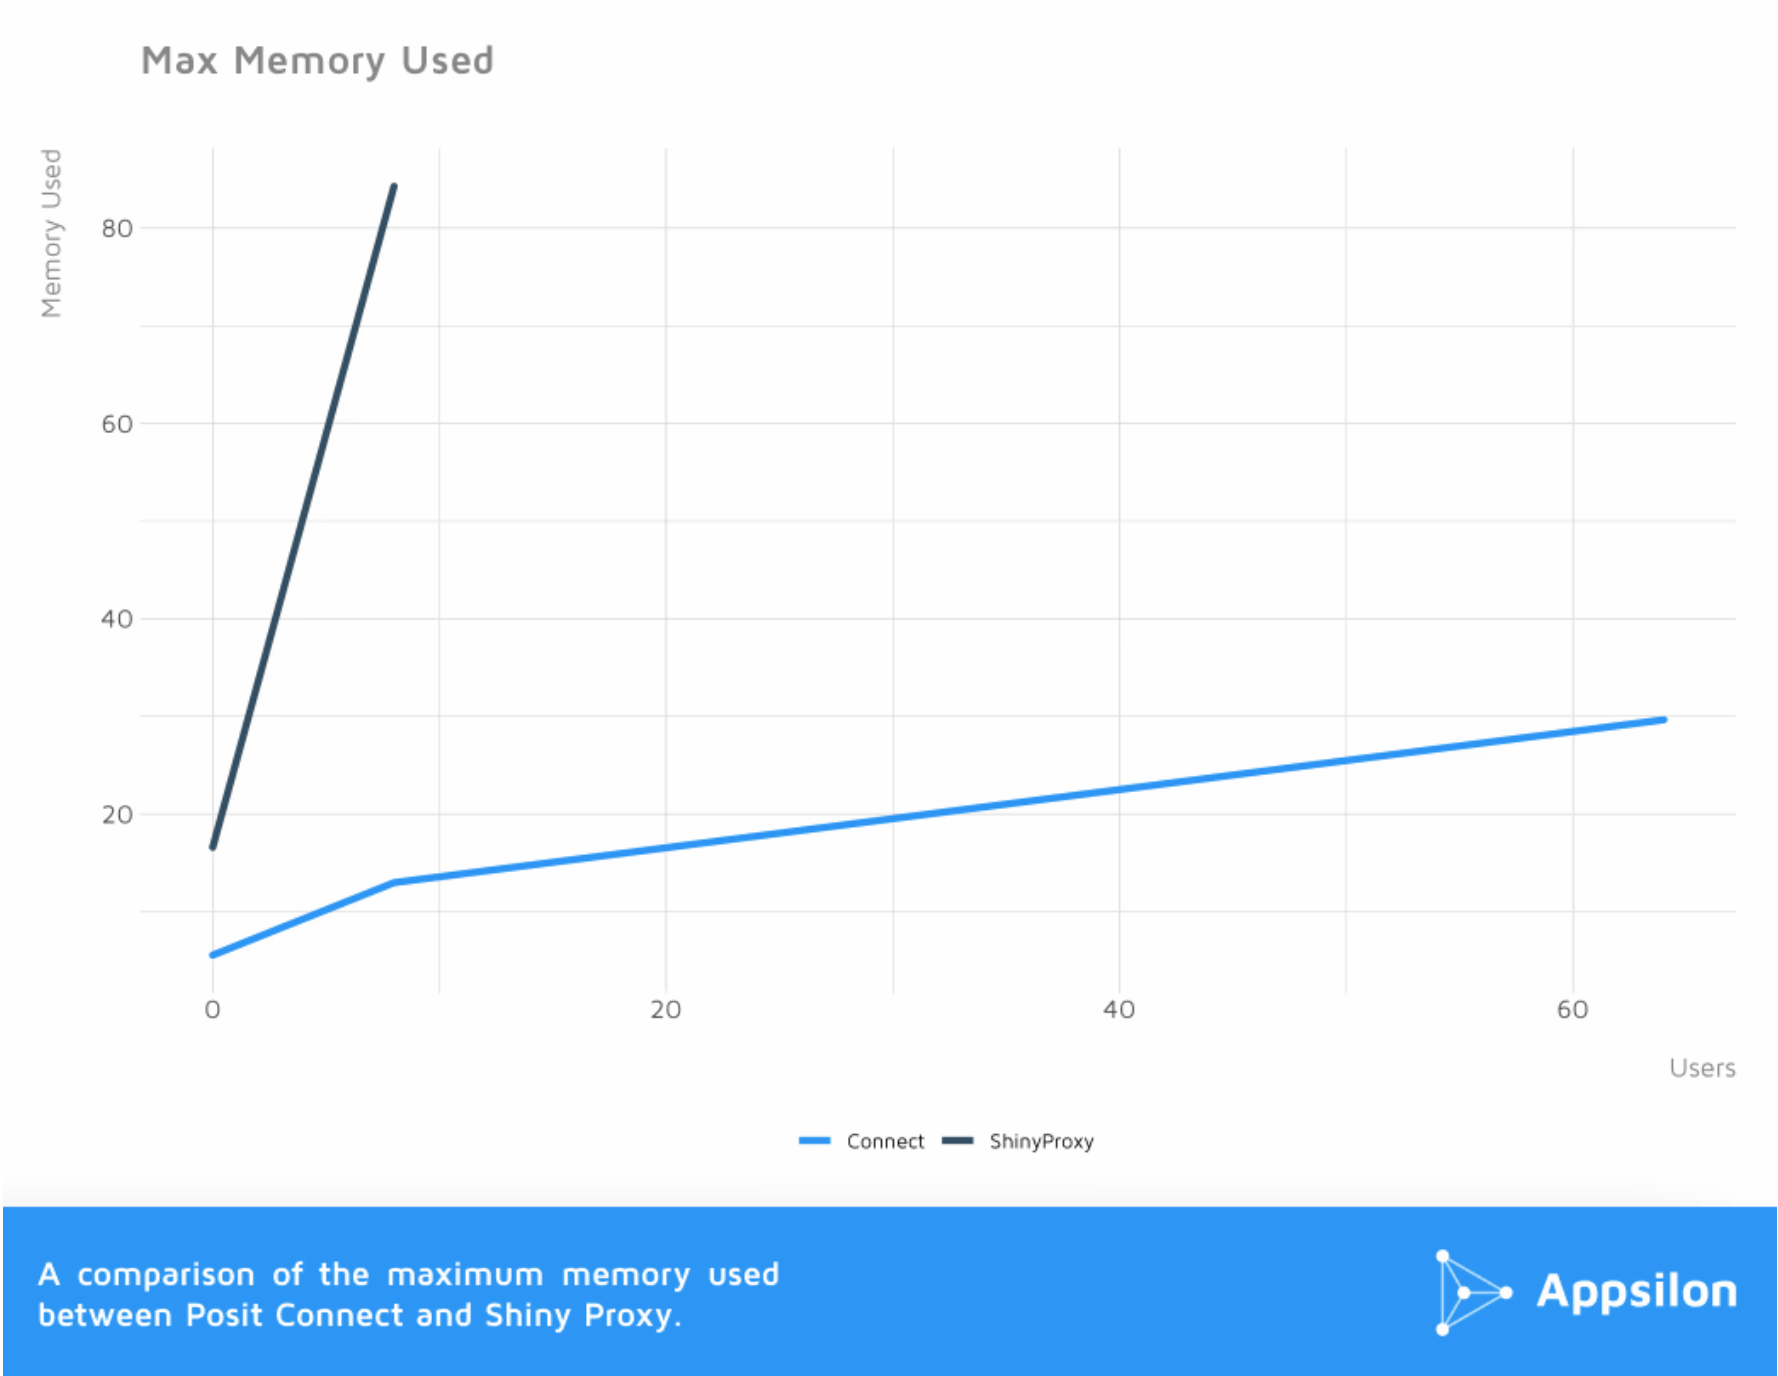

The percent of used memory reaches an all-time high for ShinyProxy at the mark of nearly 16 users where nearly 80% of the entire server memory was used by ShinyProxy to serve the example ShinyApplication.
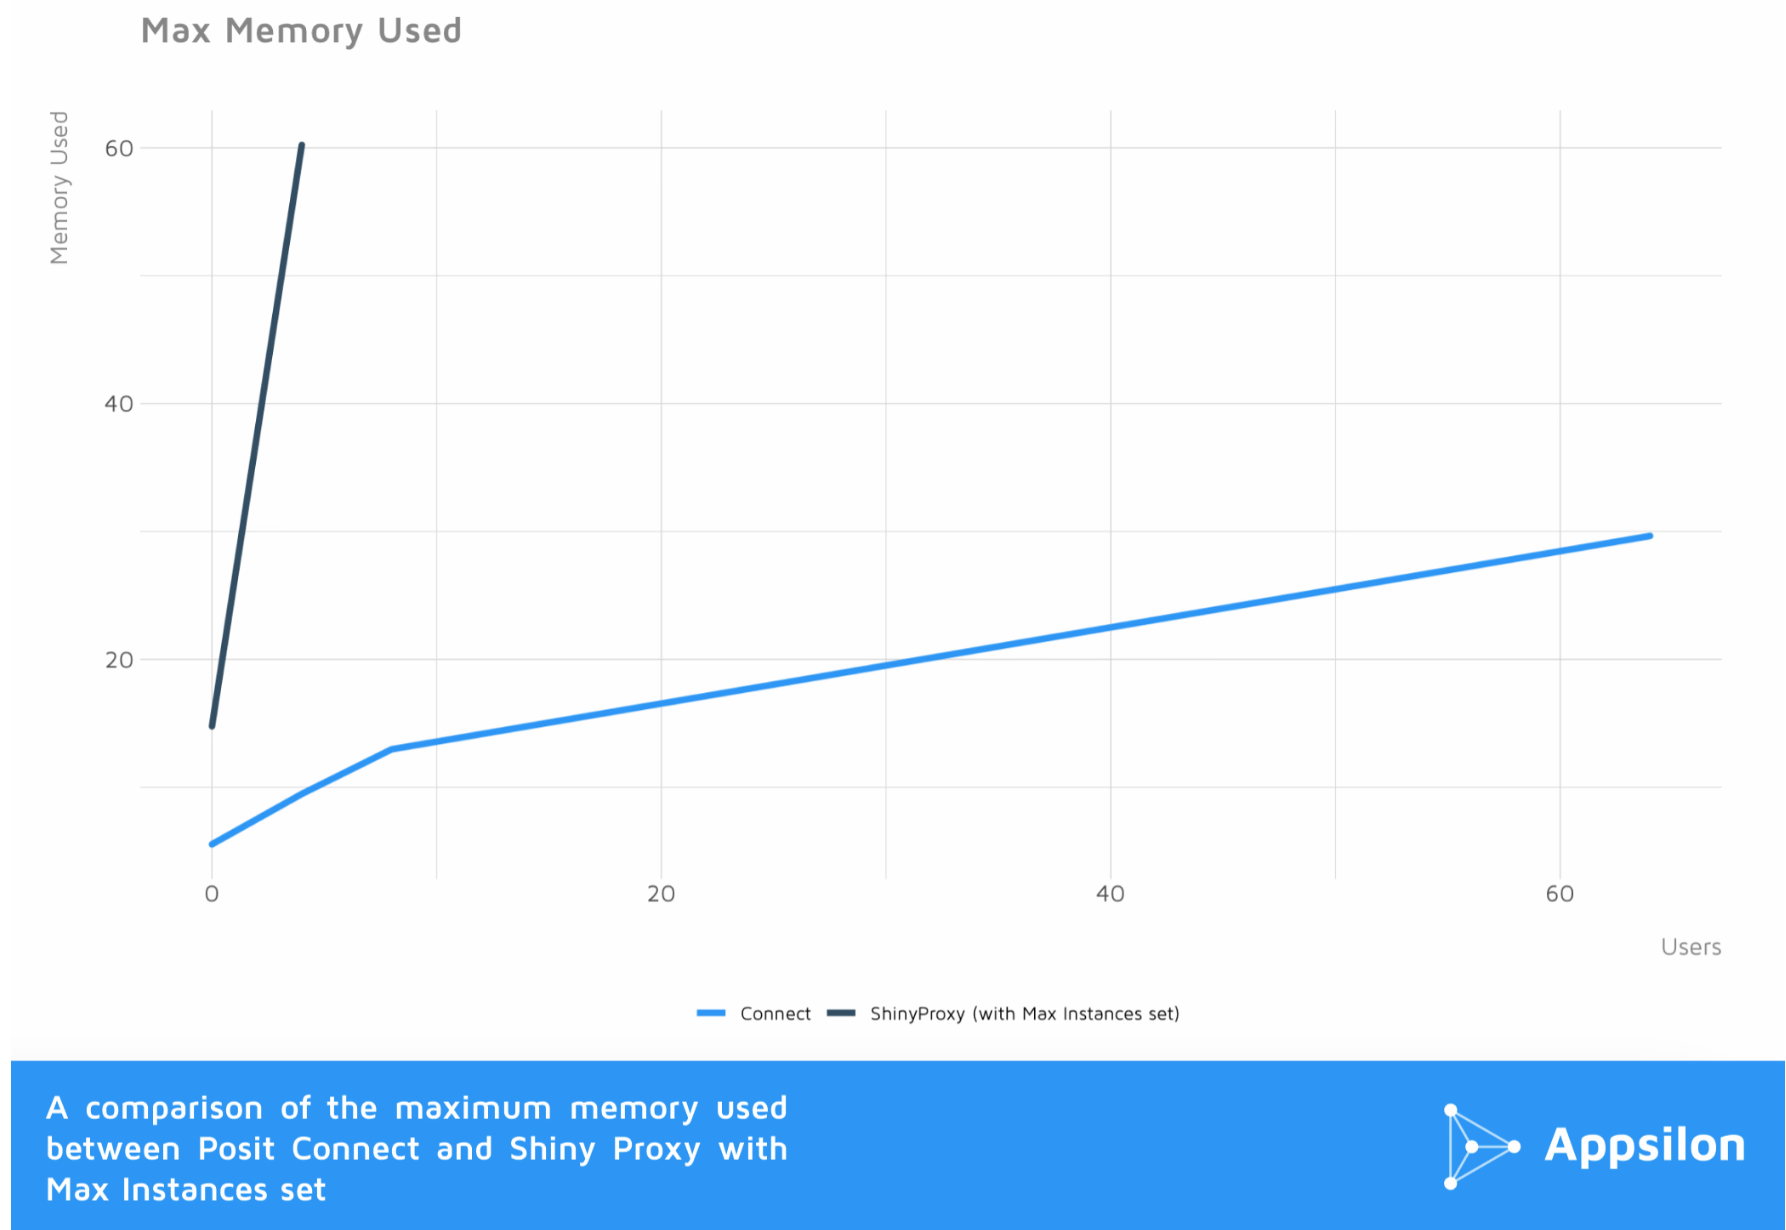
ShinyProxy max instances (+5) vs Posit Connect

With servers at idle, ShinyProxy with max instances set to +5 was found to consume three times as much memory as Connect. As concurrent users increased, significant memory consumption was consumed by both ShinyProxy installations. Ultimately, at eight concurrent users, ShinyProxy reached a peak of 84% memory consumption, as opposed to 13% for Connect.
We also found that ShinyProxy consumes more than twice the CPU resources as Connect at the same load. Connect is able to handle 64 users, consuming 30% of memory.
<div id="memswap"></div>
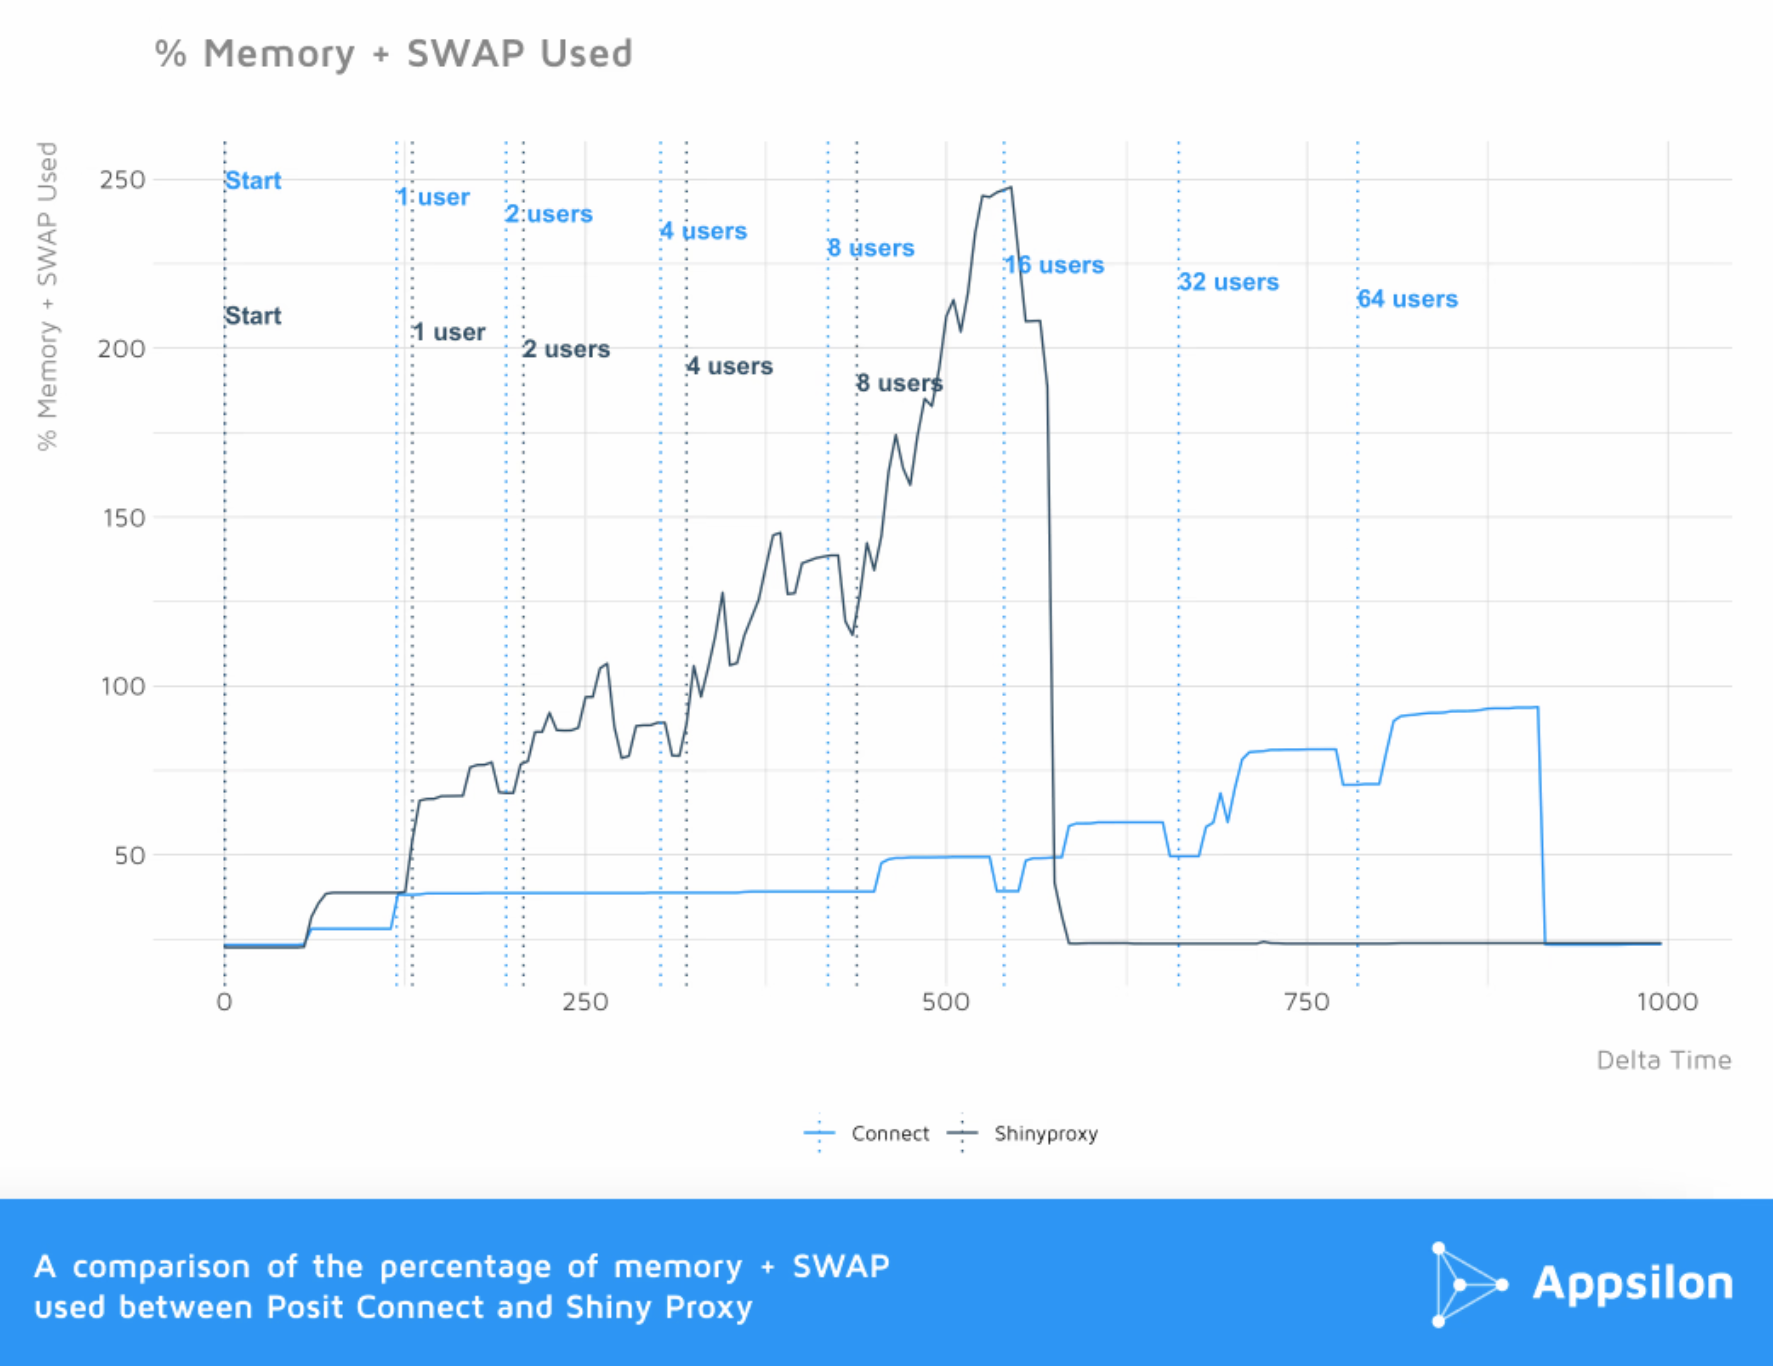
Memory + Swap used
Default ShinyProxy config vs Posit Connect

ShinyProxy max instances (+5) vs Posit Connect

Similar to the maximum memory usage, the maximum memory and swap usage shows that ShinyProxy tends to use a larger amount of memory and swap compared to Posit Connect.
<div id="cpu"></div>
CPU usage

Default ShinyProxy config vs Posit Connect

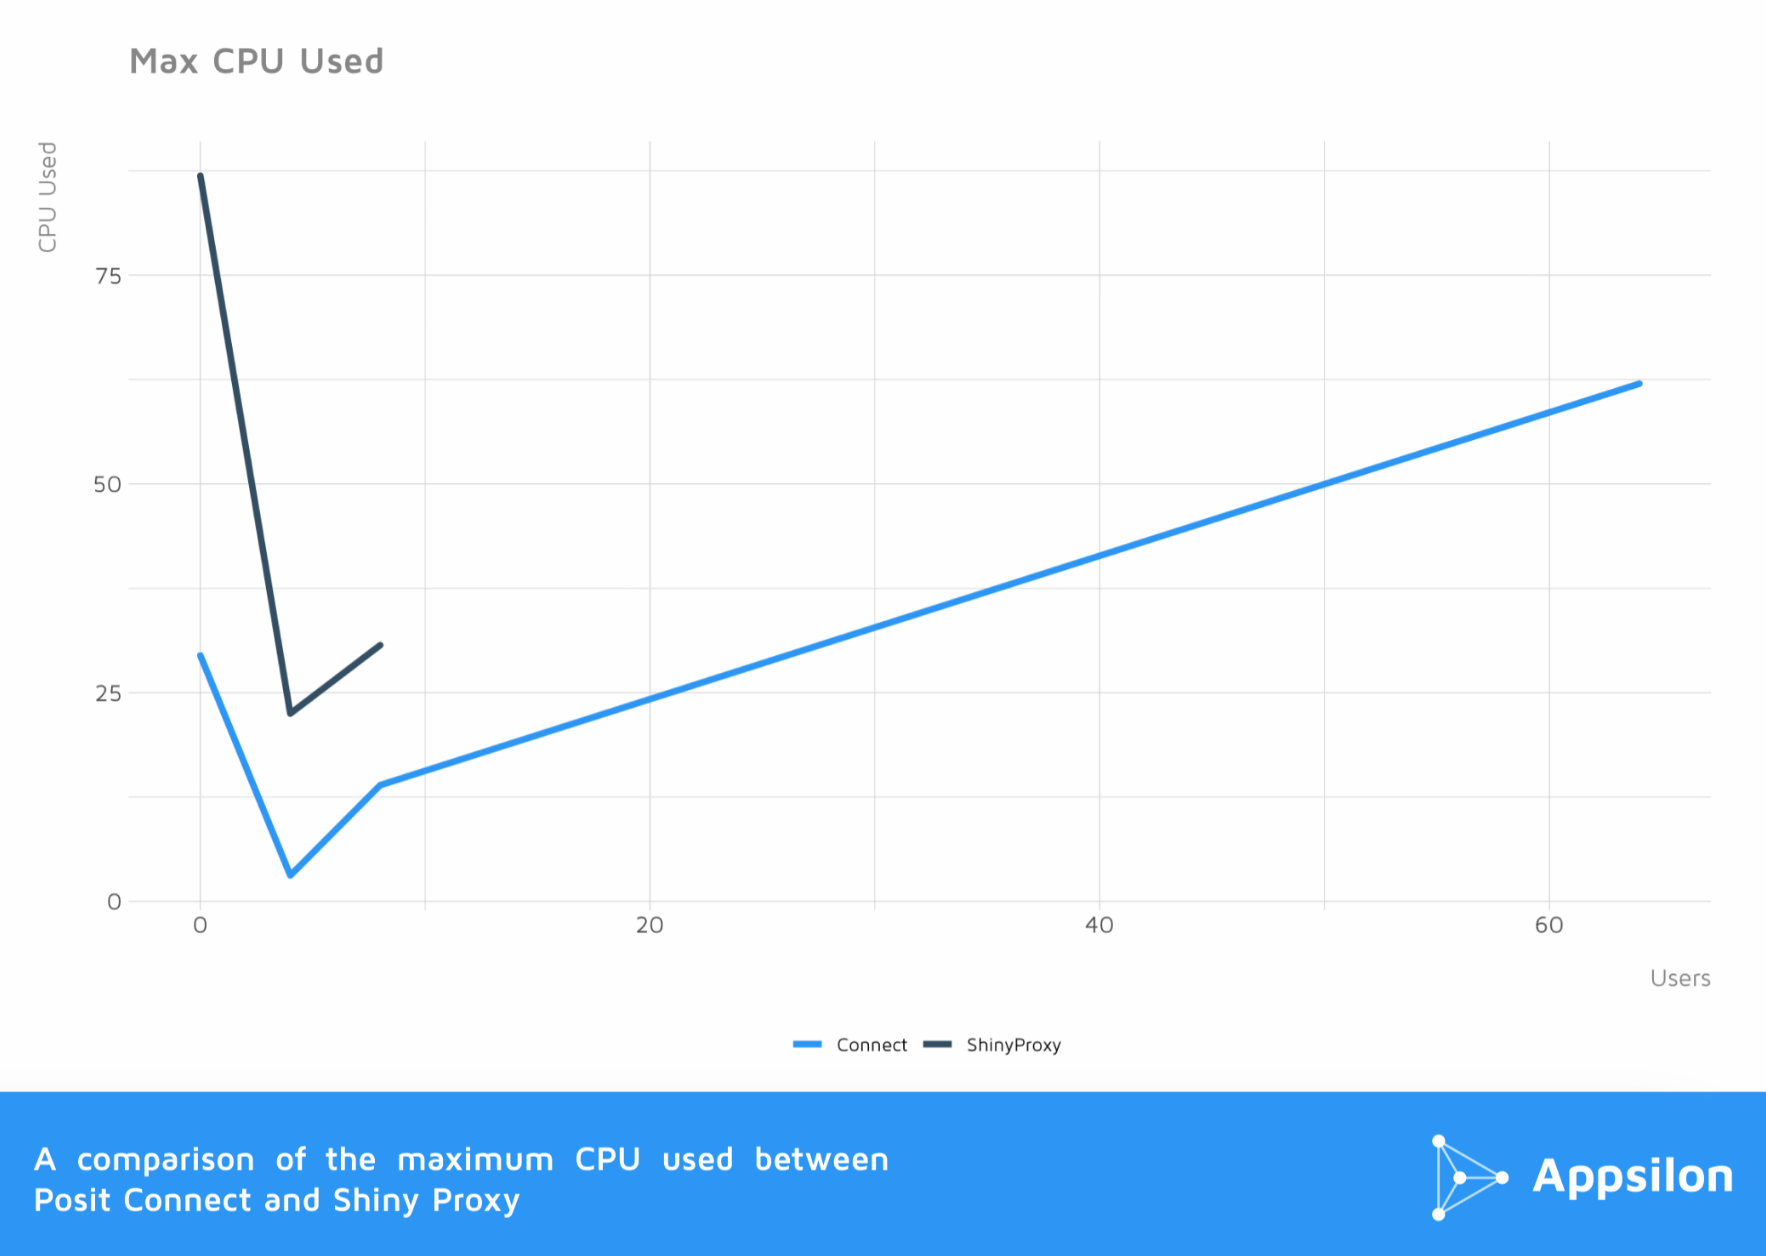
The overhead of Docker containers also consumes more CPU resources for ShinyProxy which can be seen from the initial CPU load spike (86.91%) when the servers are started (at the Start vertical line colored in blue). In terms of CPU usage in Posit Connect, even at 64 concurrent users, Posit Connect requires only 62% of CPU usage.
ShinyProxy max instances (+5) vs Posit Connect

With max instances set, CPU resource consumption drops significantly in the initial load spike, below that of Connect. However, ShinyProxy subsequently consumes double the CPU resource of Connect with the same load and exceeds that of ShinyProxy default configuration.
<div id="summary"></div>
Summary of ShinyProxy vs Connect for Scaling Shiny Apps
With the servers at idle, ShinyProxy already consumes 3x the memory as Connect. At 8 concurrent users, ShinyProxy consumes 84% of memory as opposed to 13% for Connect. Eventually, ShinyProxy crashes the server after reaching a limit of 12 concurrent users while Connect can handle 64 concurrent users consuming just 30% of memory; with max instances set, ShinyProxy crashes the server after just 8 concurrent users. ShinyProxy also consumes more than twice the CPU resources as Connect at the same load.
Are your Shiny apps slow? Speed things up with this comprehensive guide for faster Shiny apps.
In short, while ShinyProxy provides a free and open-source solution, making a Shiny application scale for multiple users will require extra effort in fine-tuning the implementation. However, any optimization of the app will benefit both servers; any optimization of infrastructure would also result in benefits to both servers.
Additionally, it requires making space for larger computing power, which in turn will cost more in the long run. Comparatively, the scalability and efficiency of Posit Connect make it a good investment for sustainable implementation for projects requiring comparable scaling.
ShinyProxy lags behind Connect in terms of memory and CPU load. With this understanding, we recommend Connect as a solution where scalability is a concern.
<div id="migrate"></div>
How to migrate to Posit Connect from ShinyProxy?
If Posit Connect is appropriate for your needs, then the next step is to consider the migration process from ShinyProxy to Connect. Since the applications built in ShinyProxy are already containerized, it will be easy to deploy them straight away to your newly purchased Posit Connect instance. All you need to do is make use of the readily available API and add some additional configurations to your application.
First impressions matter. Learn how to build a custom login page for Posit Connect.
Preparing the migration
The first step is to ensure that your project’s root directory has the prerequisite structure and files needed for Posit Connect. These include:
manifest.json --JSON file describing the requirements of this Shiny application. Create withrsconnect::writeManifestdeploy --Directory containing deployment scripts for the content. Obtain from the Connect repository.docker --Directory defining a Docker image that has your original ShinyProxy docker configuration (i.e. Dockerfile)
The JSON file will need to be created first, and then the Dockerfile from your original ShinyProxy deployment.
Note that your Dockerfile might need to be adjusted accordingly, depending on how it was originally configured.
Deployment scripts
As mentioned above, the deploy directory contains scripts that will help with your migration. Before utilizing these scripts, there are two important environment variables to set:
CONNECT_SERVER --This environment variable indicates the target Posit Connect server. It must be the base URL of your instance and end with a trailing slash.CONNECT_API_KEY --This environment variable indicates an API key owned by the target “publisher” account in the CONNECT_SERVER Posit Connect server.
Both of these need to be set as follows in your current session:
export CONNECT_SERVER='http://connect.company.com/'
export CONNECT_API_KEY='API_key_here'
Once done, you may make use of the deployment scripts:
create-content.sh --creates a new content item in your target Posit Connect serverupload-and-deploy.sh --bundles your code into a .tar.gz archive, uploads that file to Posit Connect, and requests that archive be “deployed”
create-upload-deploy.sh -- combines both of the scripts above into a single command
Docker deployment
Now that everything is in place, you can migrate your existing ShinyProxy by building your docker image, and then running the deployment scripts.
With your Dockerfile in the docker directory, you can build your image by simply running:
docker build -t posit-connect-migration:latest docker
The posit-connect-migration:latest tag here is used to easily identify your image for the following steps.
To simplify things, use the create-upload-deploy.sh script to complete your deployment:
Please note that using create-upload-deploy.sh will create a new content item and deploy in one go.
If you want to keep updating an already created content item in your target Posit Connect server, you will need to instantiate the item using create-content.sh just once, and then use upload-and-deploy.sh to update that item using its specific ID.
For more information, you may refer to the official guide.
Are your Shiny apps secure? Learn why you should be using Posit Connect Authentication and how to set it up.
Addendum: ShinyProxy Max Instances vs Posit Connect
“It’s not a ‘real-world’ Shiny app!”
- A larger, more complex Shiny app will use more memory on both servers.
- Optimizing the app will benefit both servers.
“The servers are not optimized!”
- Both servers were installed out of the box as described in their respective documentation.
- Of course, better infrastructure can be used for these servers to produce better results. But, results will be better for both servers.
- Shinyproxy has a lot of catching up to match Connect in terms of memory and CPU load.
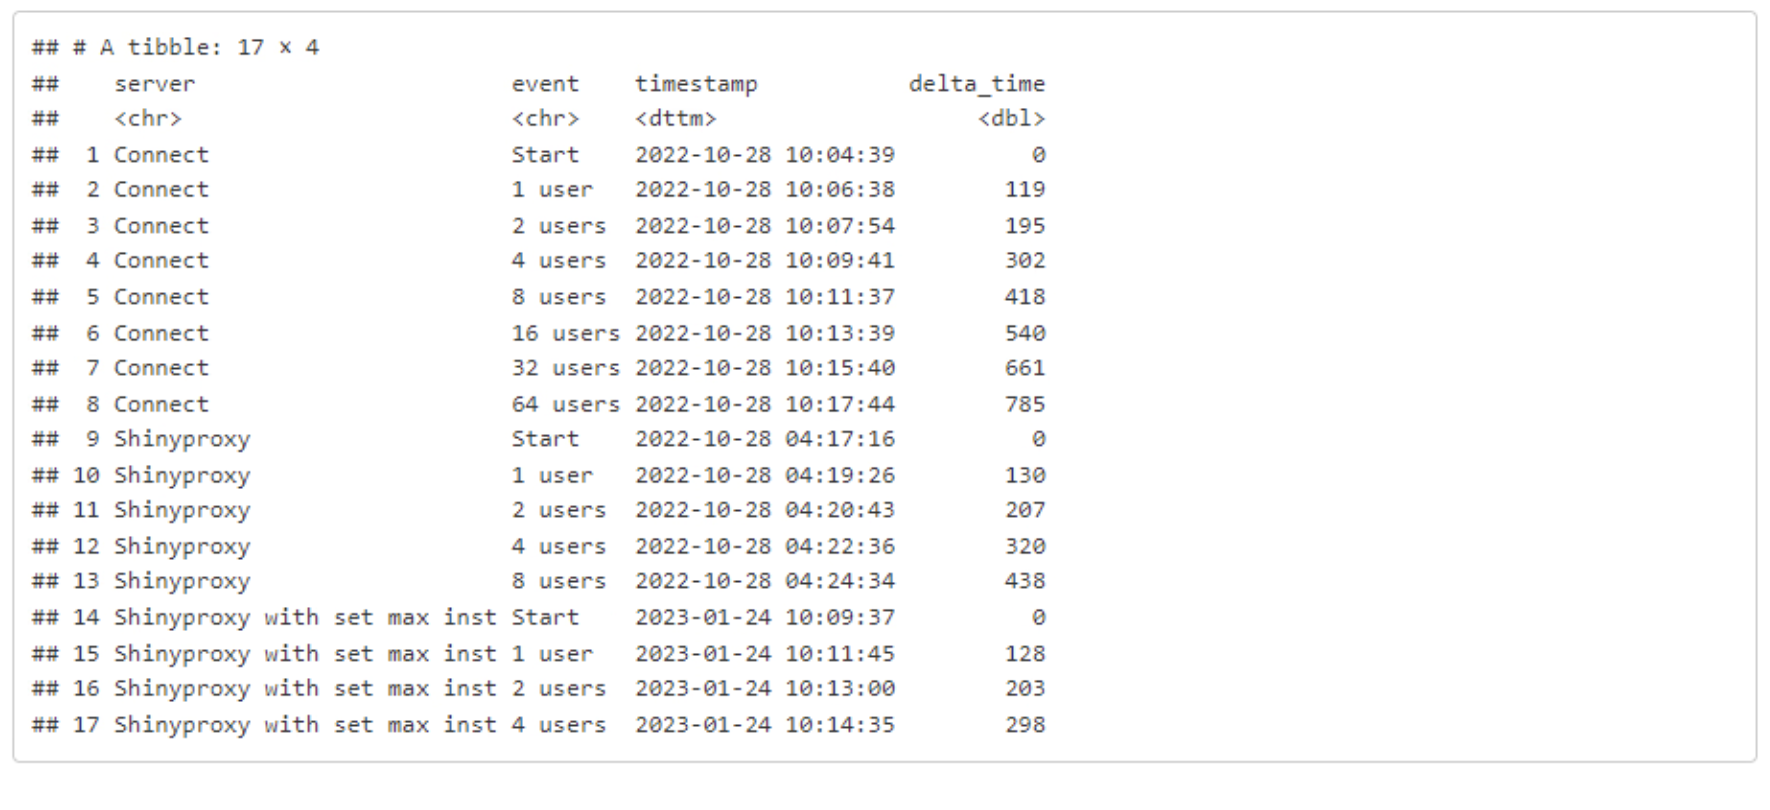
Test events
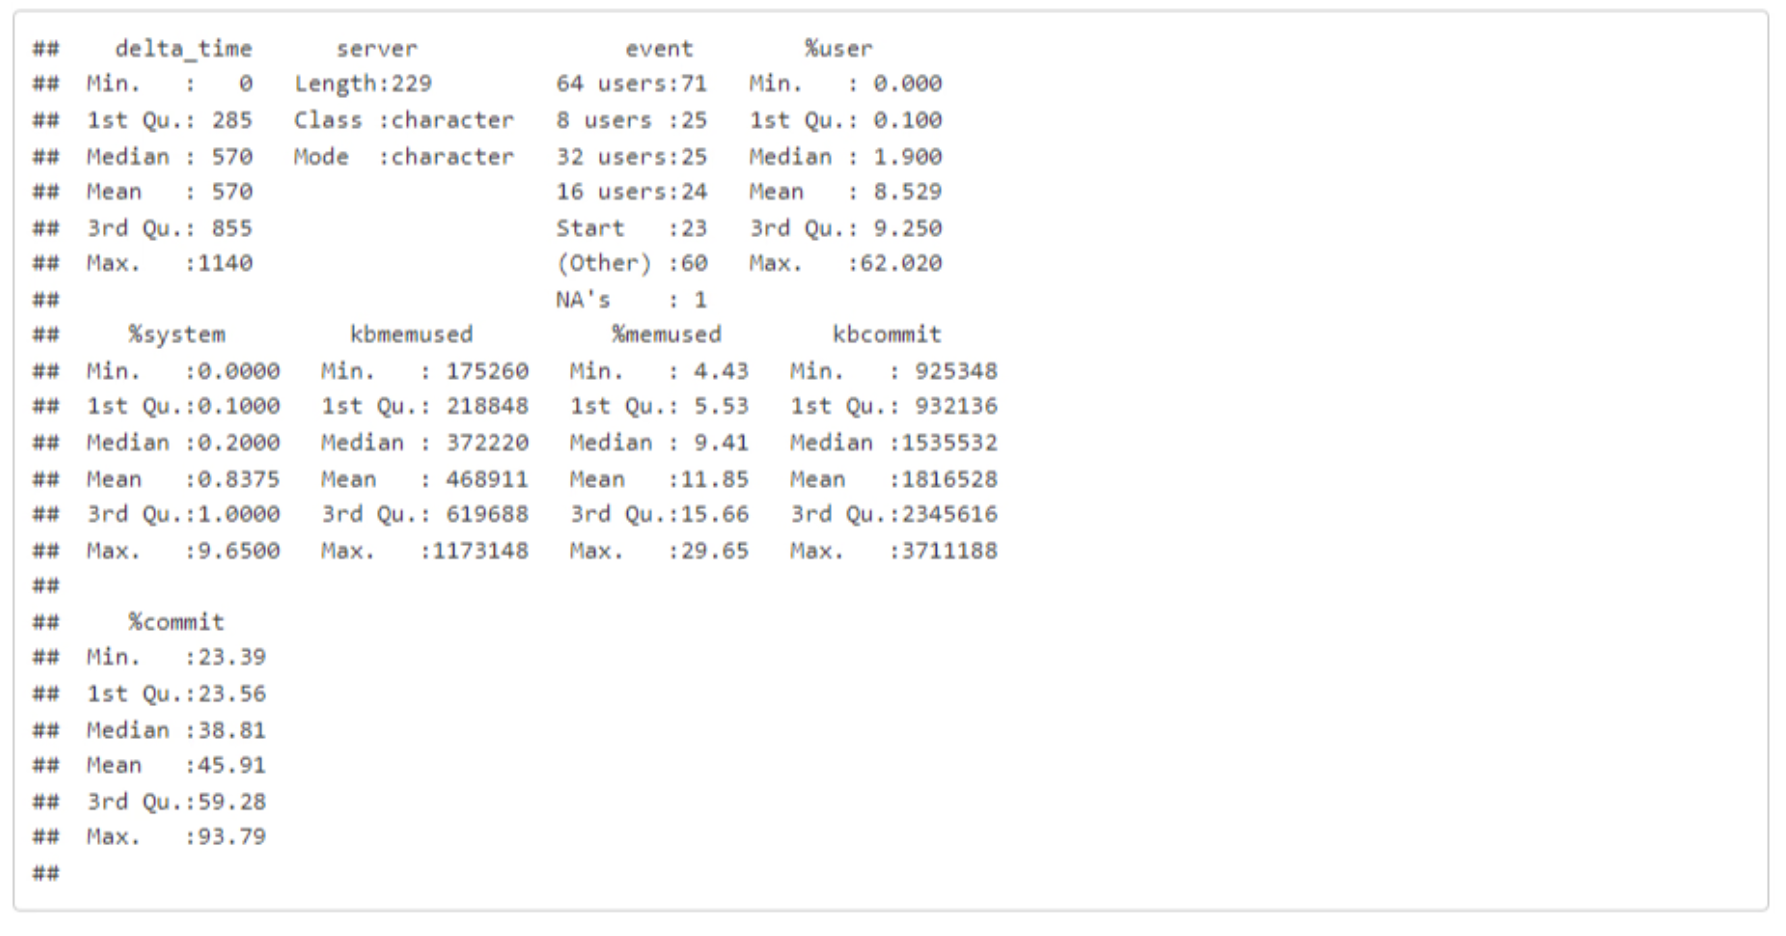
Refer to the sar documentation for the system log values descriptions.
ShinyProxy system log
Connect system log
Notes on ShinyProxy
Proxy.default-max-instances
proxy.default-max-instances is a user-level limit. A user meaning: a browser-user-session. For each user, only one docker instance is instantiated even if they open multiple tabs of the app.
ShinyProxy with default settings (no proxy.default-max-instances)

Default ShinyProxy with multiple tabs
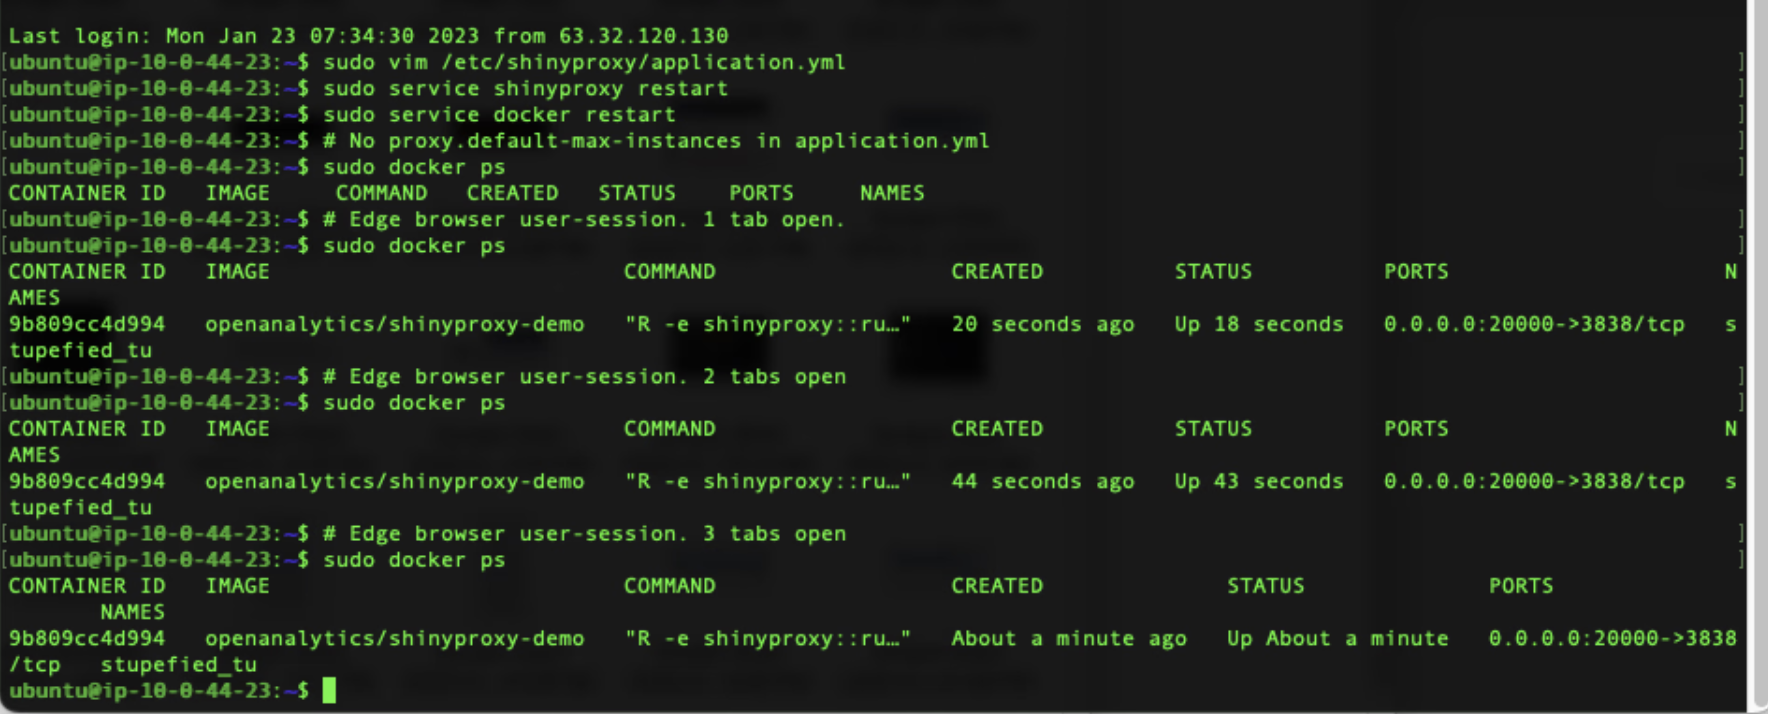
Default Shinyproxy with multiple tabs. One container instantiated.
Here we have one user accessing the app with several browser tabs open at the same time. This user has only one user-session with the server hence only one container is instantiated.
Default ShinyProxy with multiple users
Still with Shinyproxy without proxy.default-max-instances set, we will now simulate multiple user-sessions connecting to the server by using 4 different browsers.
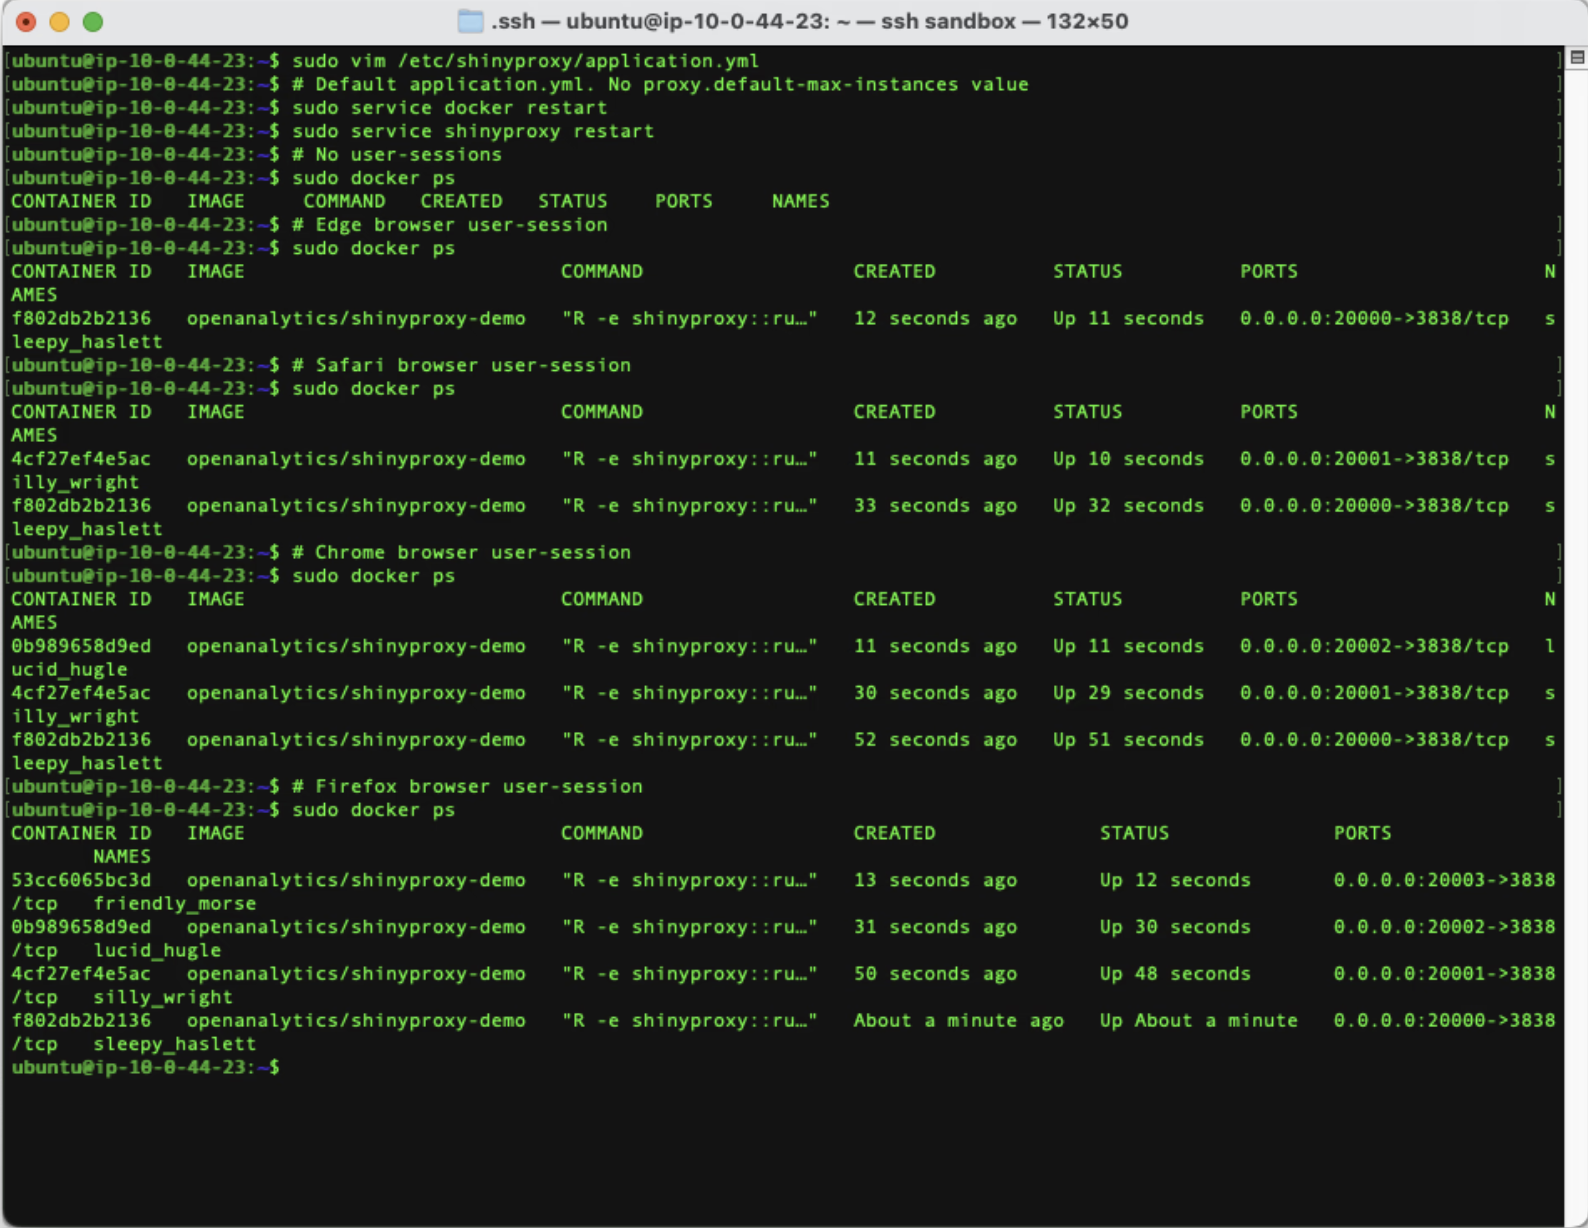
Default Shinyproxy. Multiple users. Multiple containers instantiated.
Every time we connect to the app using a different browser, a new container is instantiated.
This is how our previous test runs behaved. When shinyloadtest shinycannon replays a recorded test, it instantiates worker threads. Each of these workers simulates a single user accessing the app. For ShinyProxy we ran the test with 1 worker, then 2, then 4, then 8.
ShinyProxy would then launch one docker container instance for each worker.
Setting proxy.default-max-instances
How does adjusting proxy.default-max-instances make ShinyProxy behave differently then? It provides a user with the ability to launch new instances of the app. This causes ShinyProxy to launch a new docker container for the user. The user will then have two separate shiny app instances running (one docker container for each shiny app).
default-max-instances set. Chrome browser. Multiple app instances.
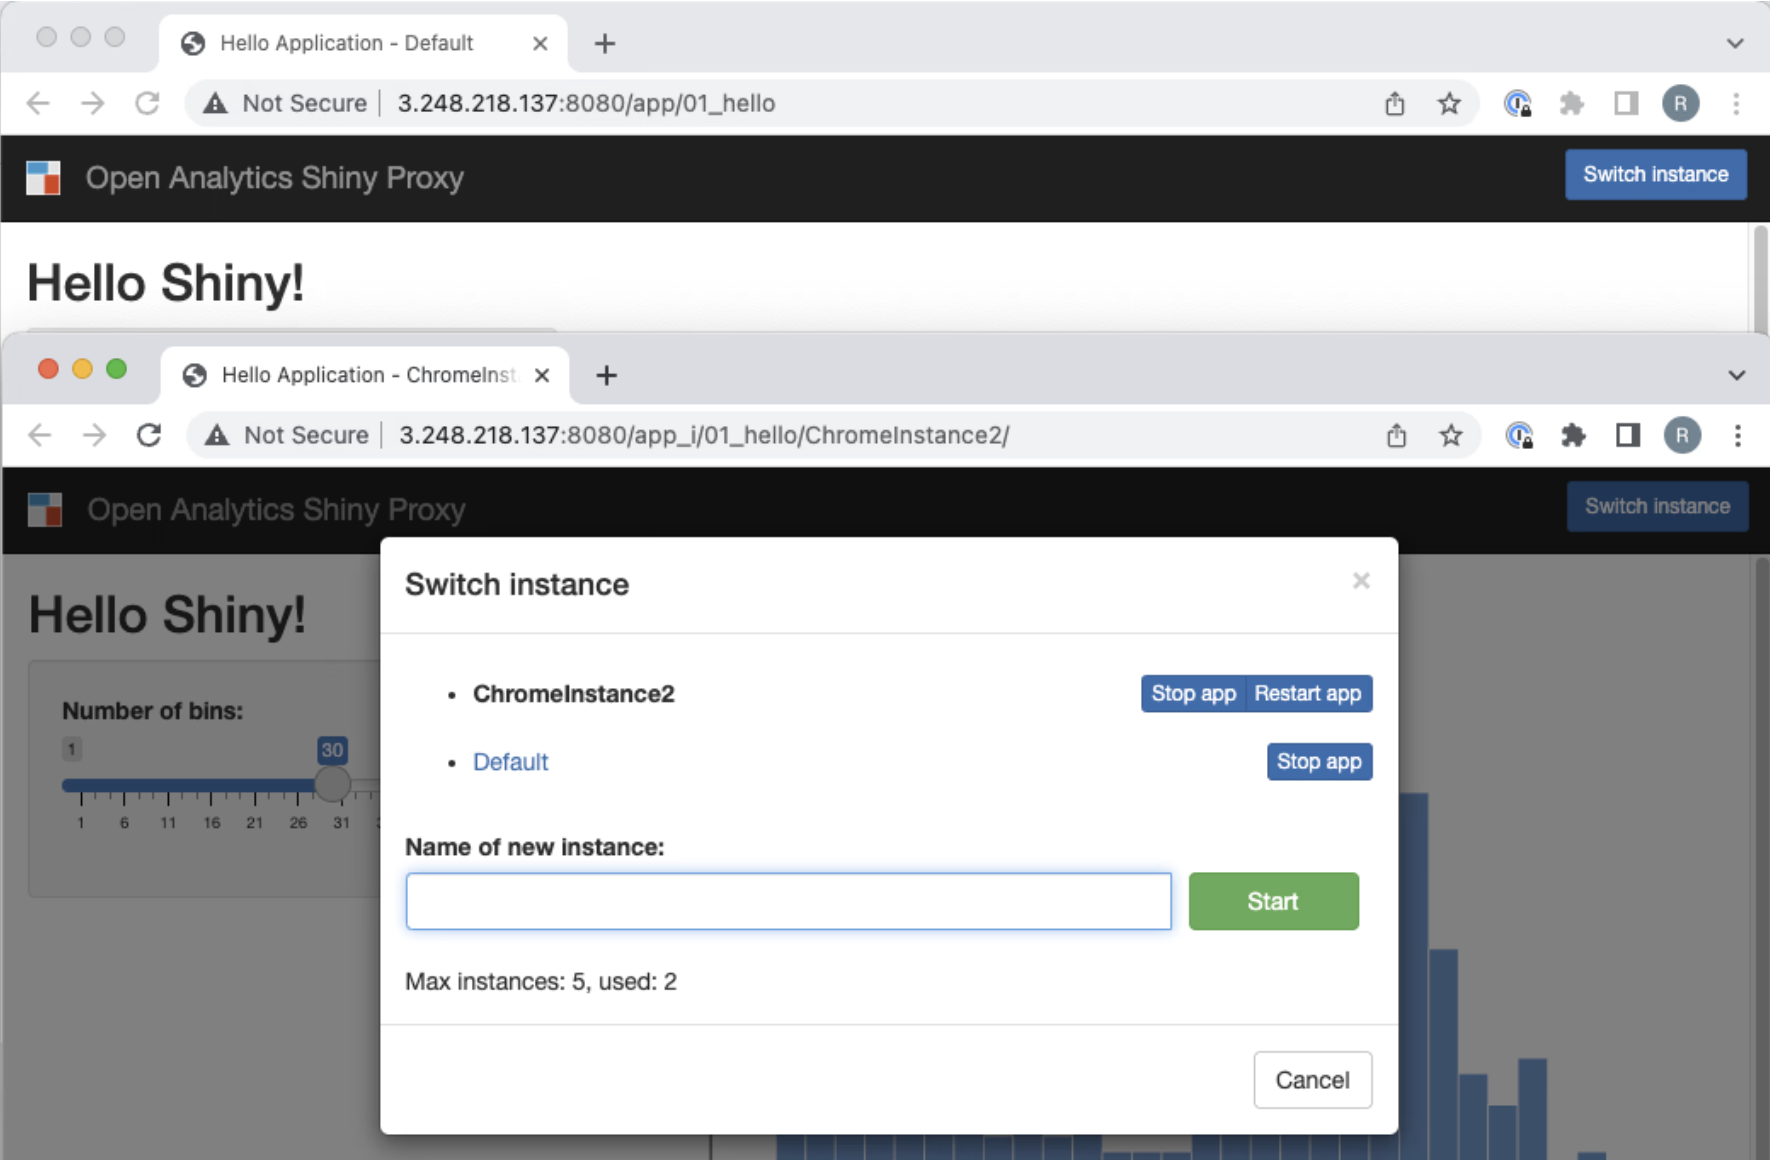
A user creates a second app instance:
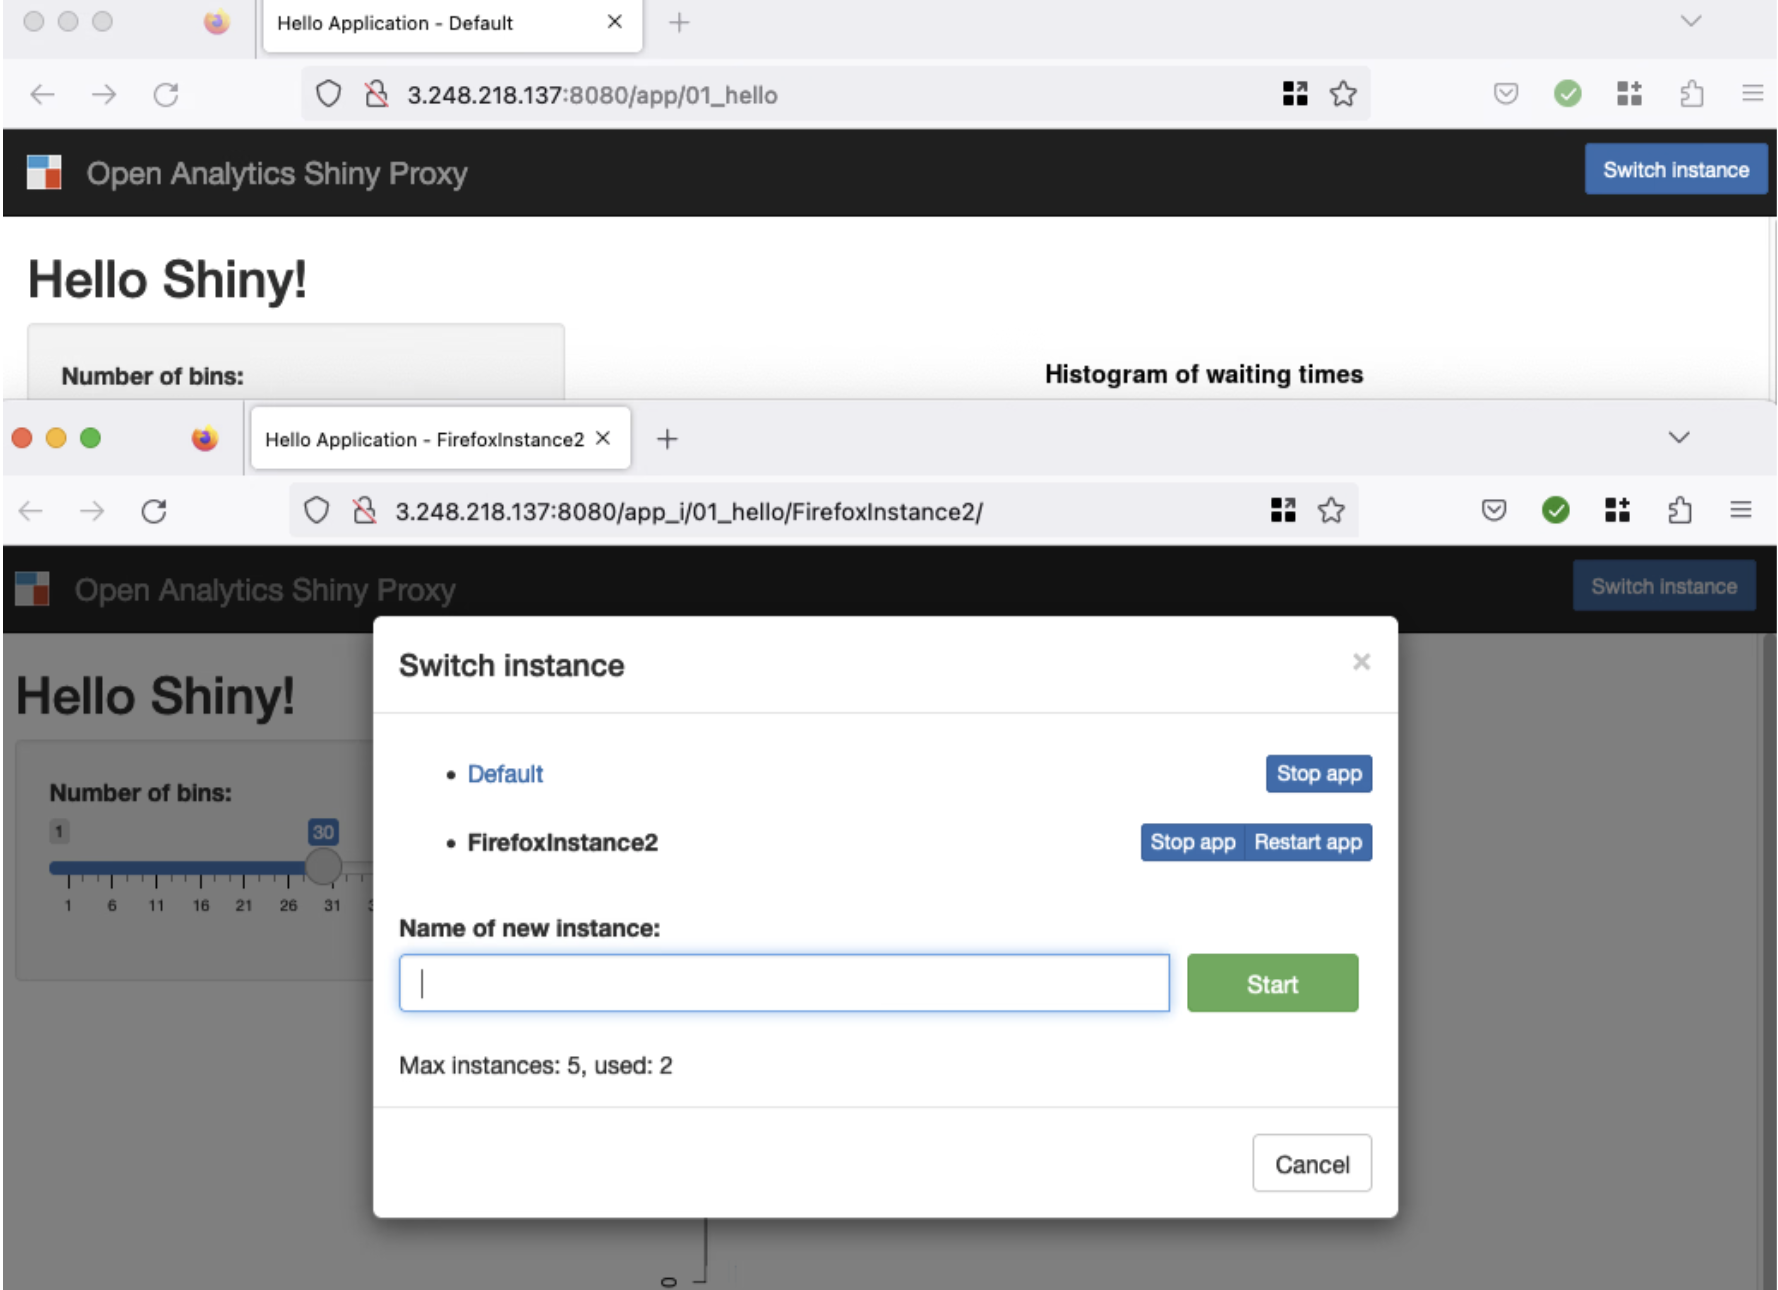
default-max-instances set. Firefox browser. Multiple app instances.
We use Firefox to simulate a second user accessing the app. Then the user creates a second app instance.
Two user-sessions, with two app instances, each resulting in four docker container instances of the same Shiny app image.

default-max-instances set. Docker container list.
This is the same as four user-sessions with one app instance each. ShinyProxy launches one docker container instance for each Shiny app instance. This is why it eats up system resources quickly. The system usage increases not by connected users but by running docker container instances.
Shinyloadtest, shinycannon, and ShinyProxy
Loadtest run with one worker
shinycannon runs with 1 worker for 1 minute.
Default ShinyProxy config
Default max-instances set
One shinycannon worker is being served by up to 4 docker containers.
ShinyProxy and browser sessions
In order to understand why 4 docker containers were running with just 1 shinycannon worker, a simple experiment was performed.
- Clean ShinyProxy environment. No docker containers loaded.
- A browser is used to access the Shiny app.
- The browser is closed (quit).
- A browser is used to access the Shiny app.
This resulted in two docker containers running. The first one is a remnant of the first access. This will remain running/active until the container hits the timeout setting. And a second one, a new container for the second access.
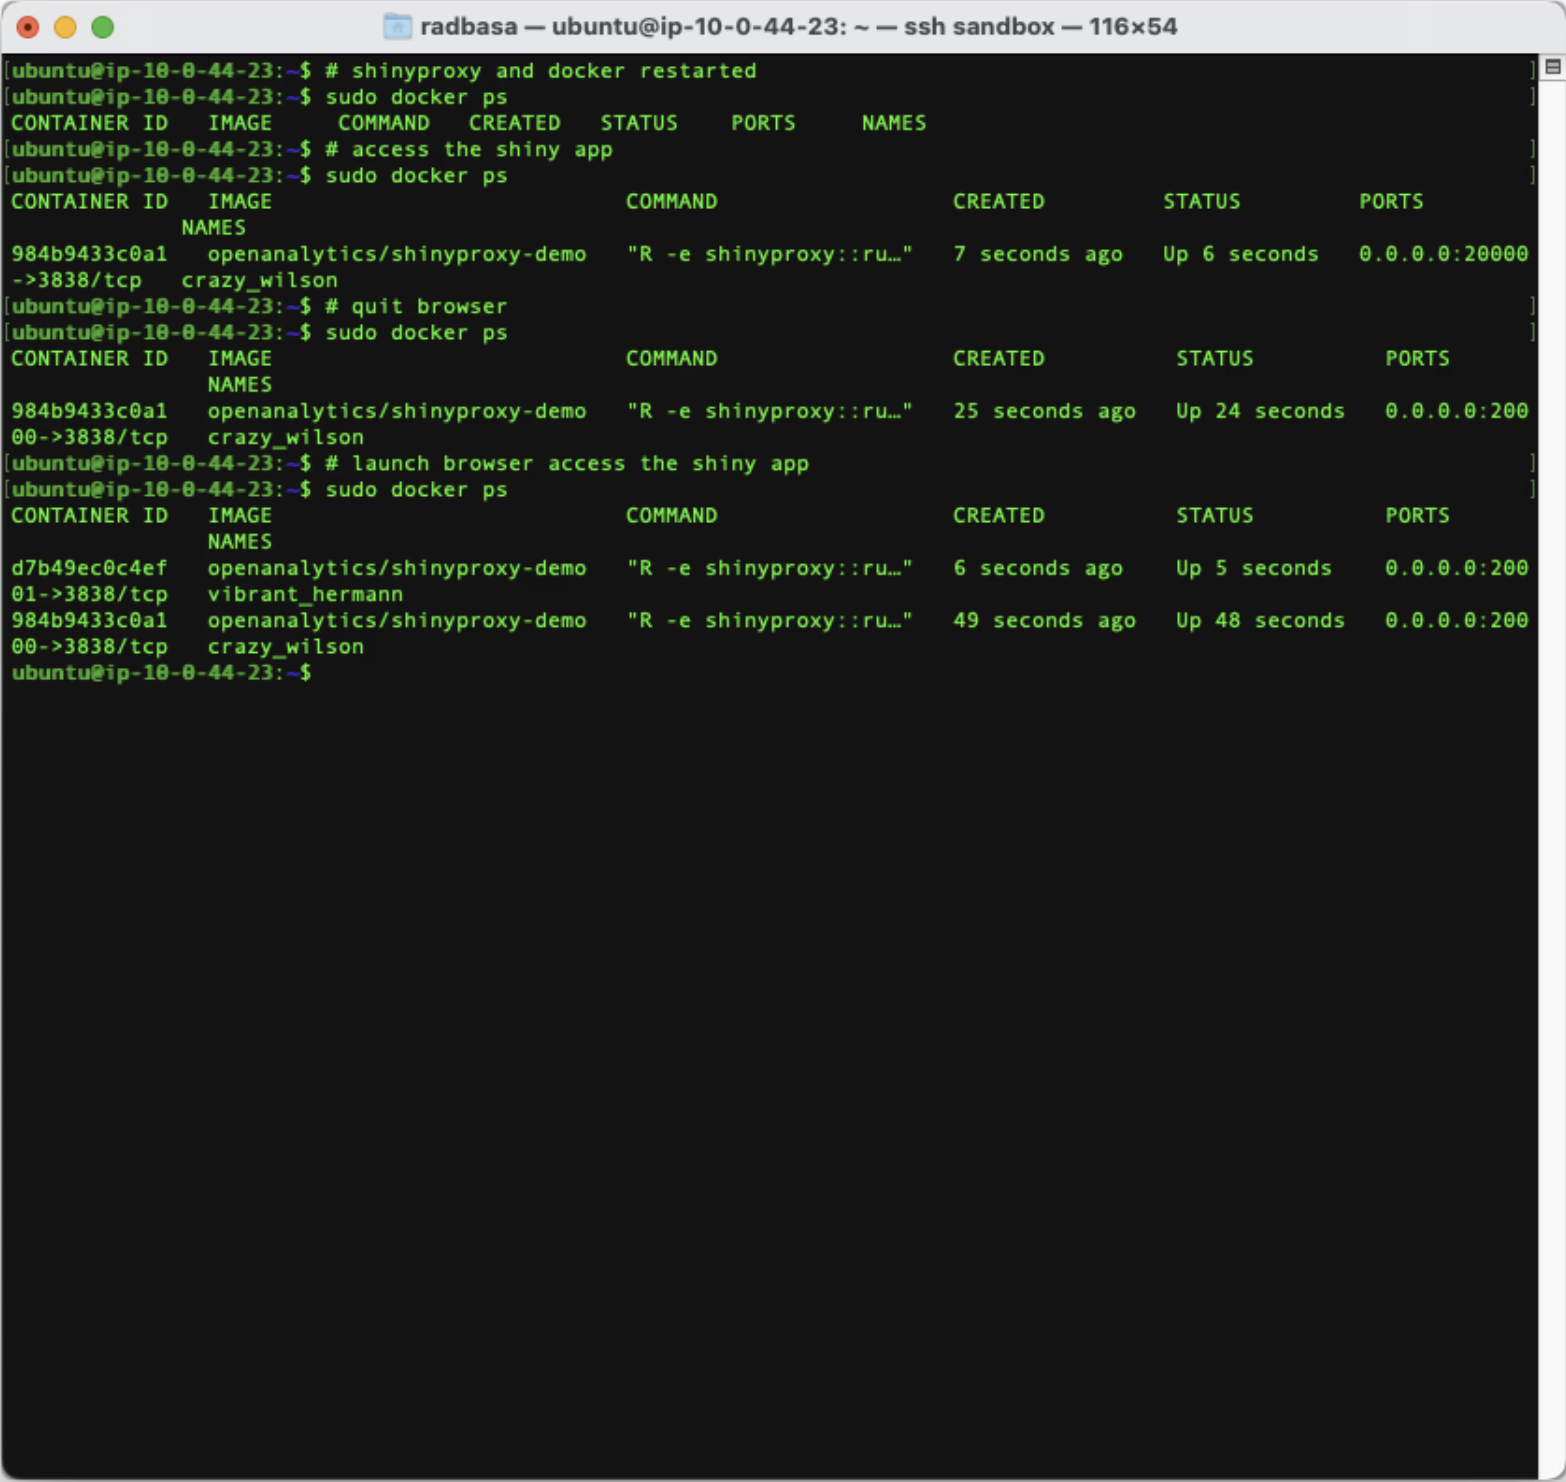
ShinyProxy and browser closed and opened.
Shinycannon replays a shinyloadtest recording. It will repeat this recording to fill up the loaded-duration-minutes setting (shinycannon recording documentation). It appears that shinycannon uses a new and separate thread for each run.
<iframe> to test with shinyloadtest
Shinyproxy does not serve Shiny apps directly. It serves Shiny apps inside an <iframe>. This is so that Shinyproxy can exert some control over the Shiny app.\
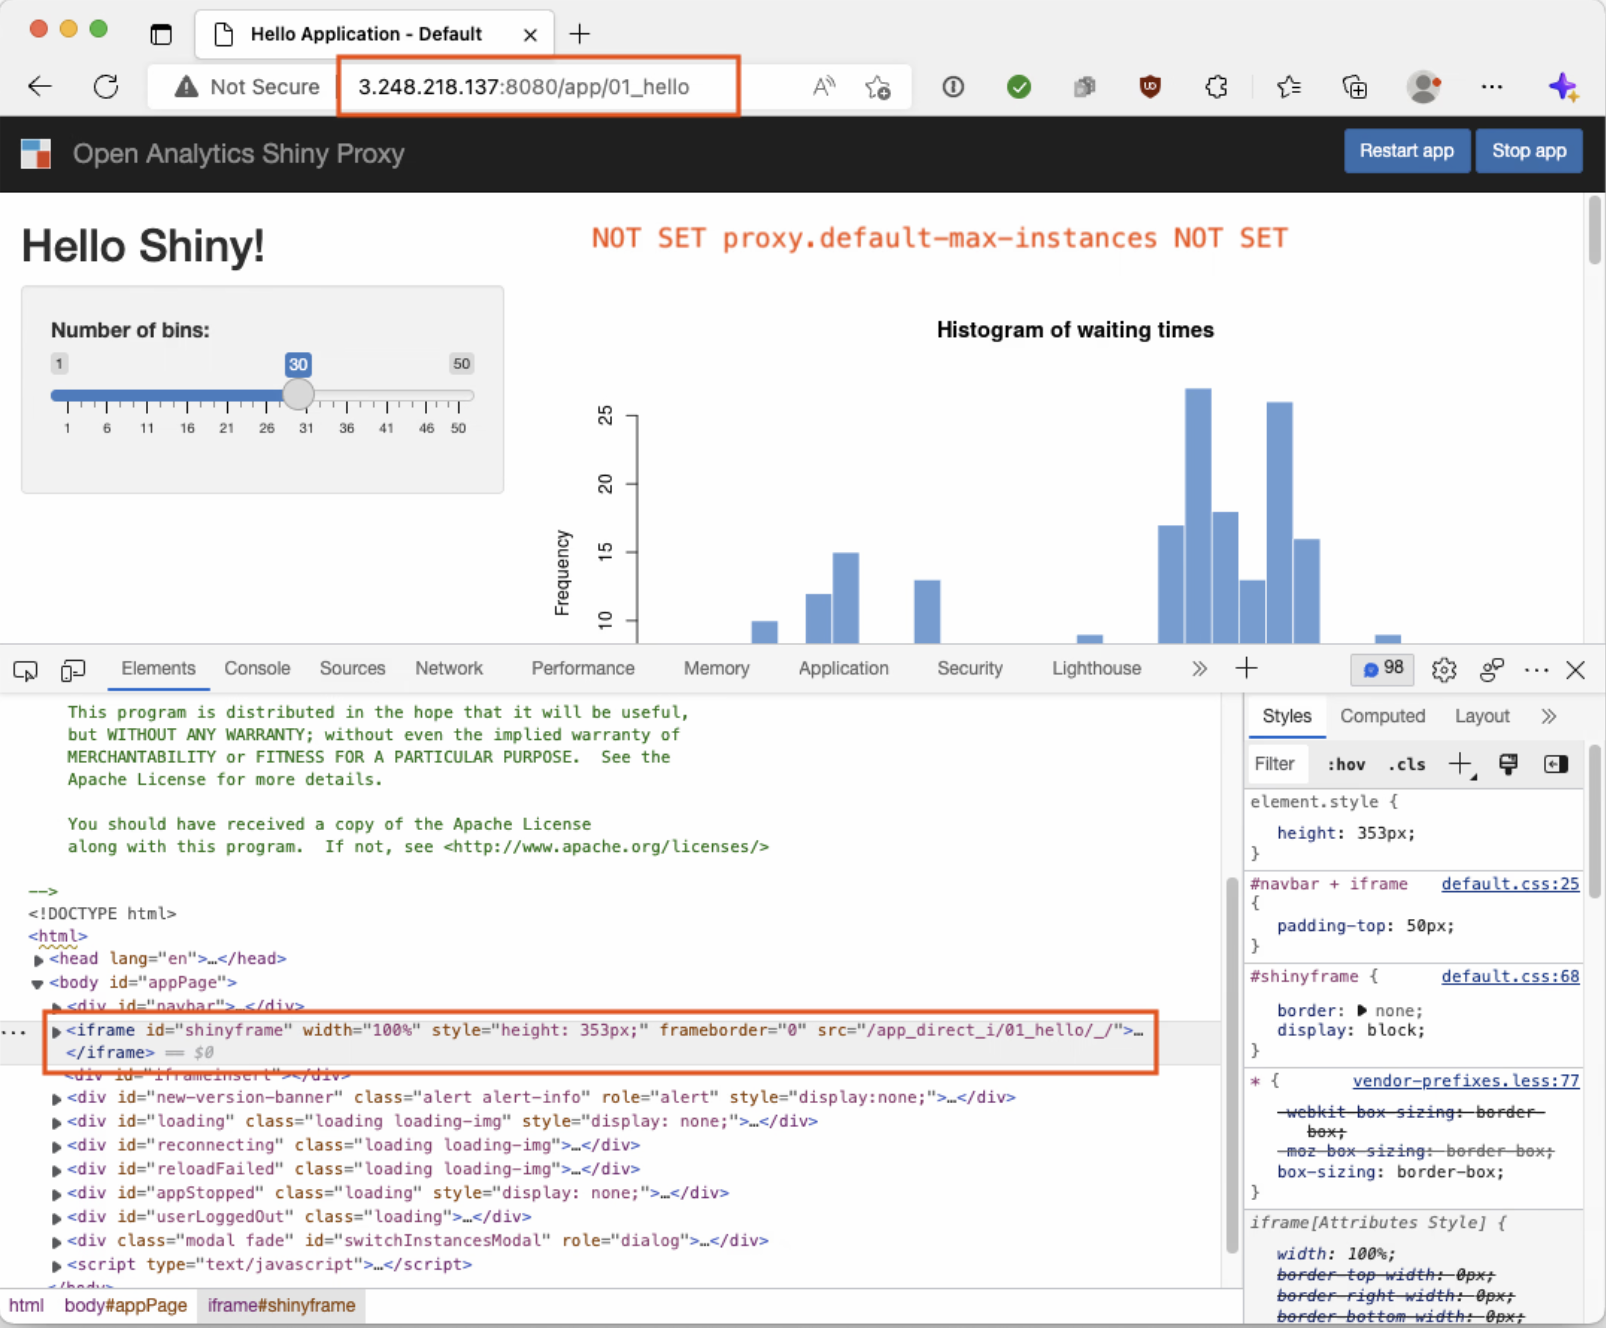
iframe default ShinyProxy.
With a default configuration, the actual Shiny app is inside an <iframe>.
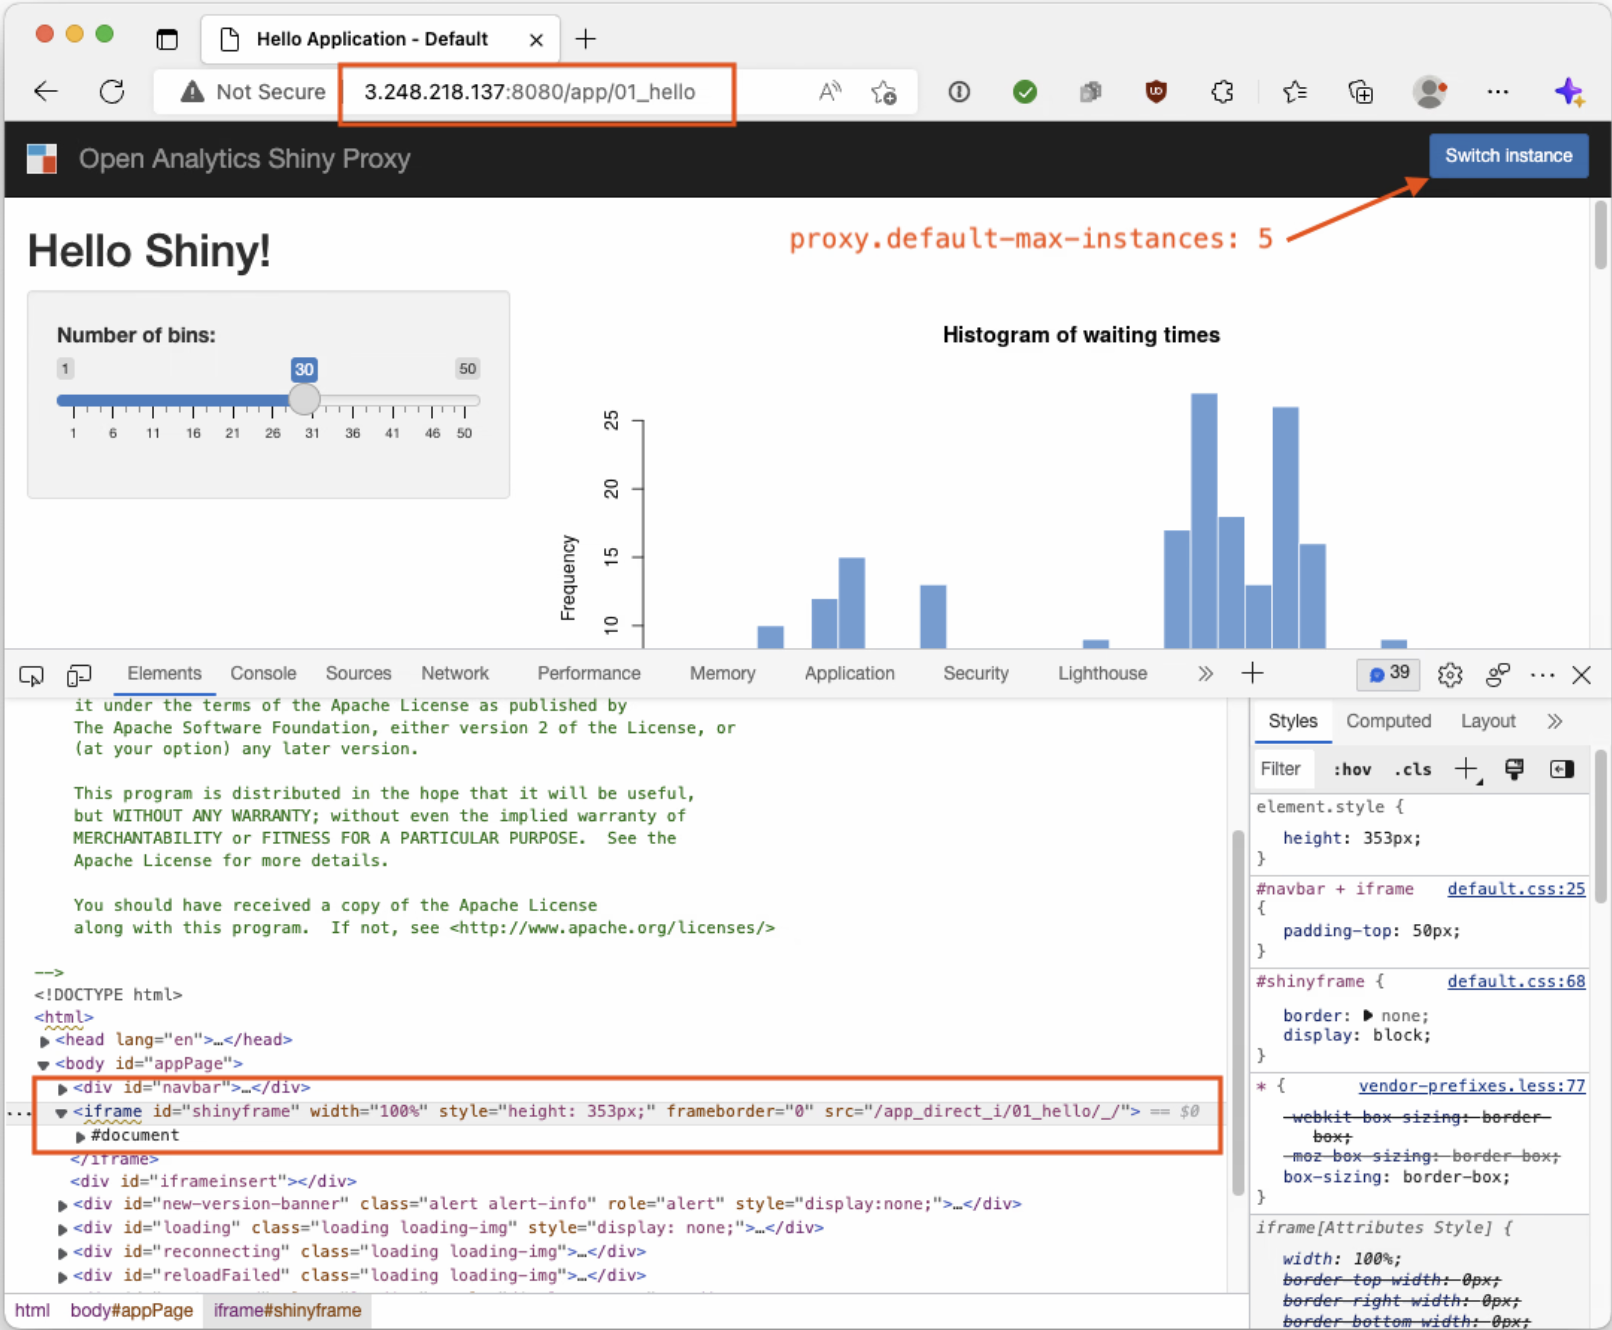
iframe multi-instance ShinyProxy.
With proxy.default-max-instances: 5, the actual Shiny is also inside an <iframe>.
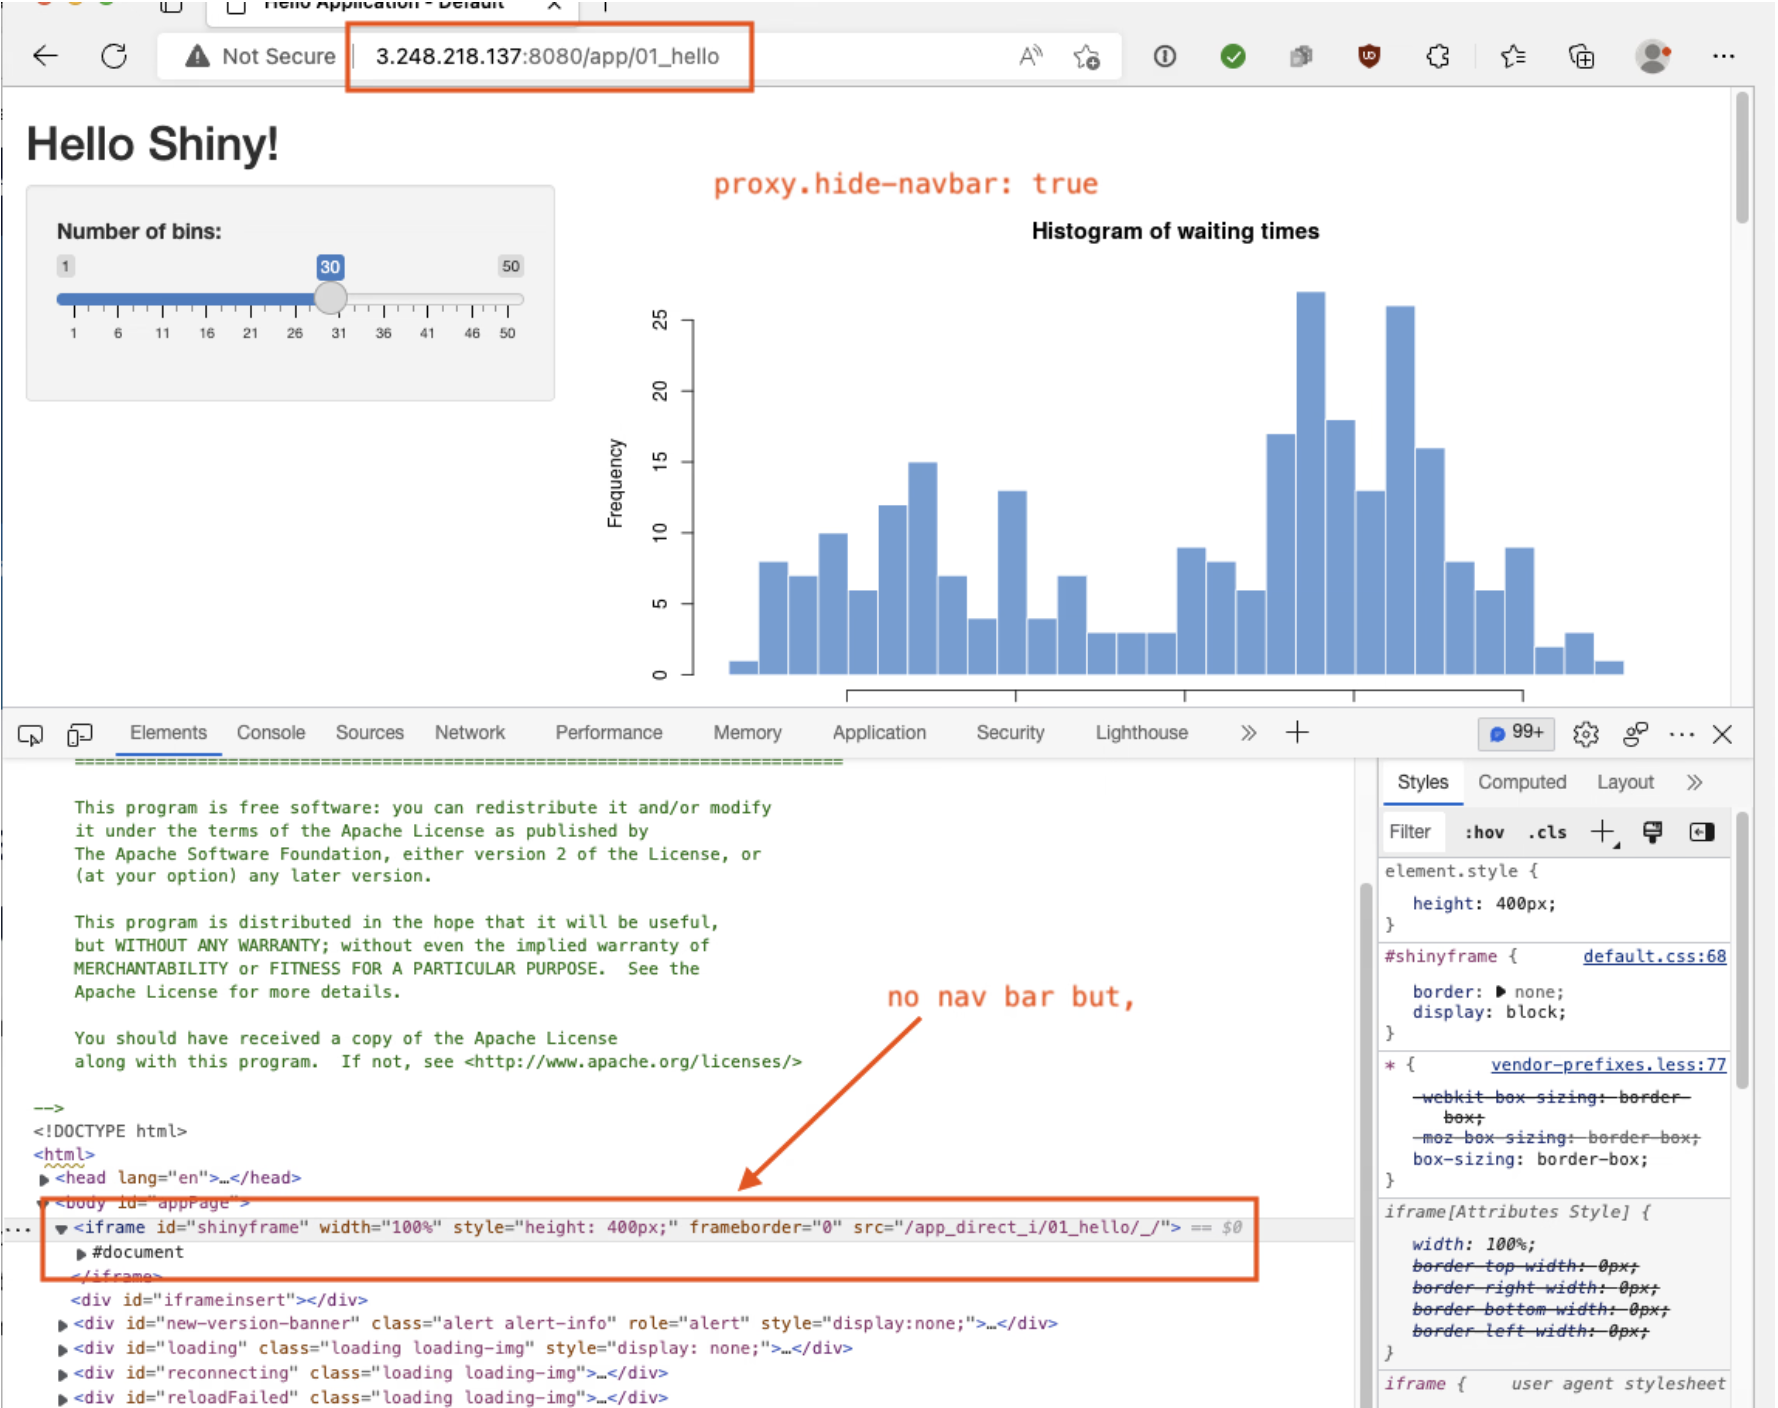
Even if we hide the navbar, the actual Shiny app is still inside an <iframe>.

Actual Shiny application.
The target URL of the <iframe> is the actual Shiny app we want to test.
This is why the published URL of Shinyproxy apps (http://server.com/app/01_hello for example) cannot be directly tested using shinyloadtest.

Loadtest on default ShinyProxy.

Loadtest on multi-instance ShinyProxy.
To get a shinyloadtest recording with a ShinyProxy app, we need to use the direct target URL from the <iframe>: /app_direct_i/01_hello/_/.
The default ShinyProxy and the multi-instance ShinyProxy configuration will have the same target URL.

Loadtest on the target URL on default ShinyProxy.
Loadtest on the target URL on multi-instance ShinyProxy.
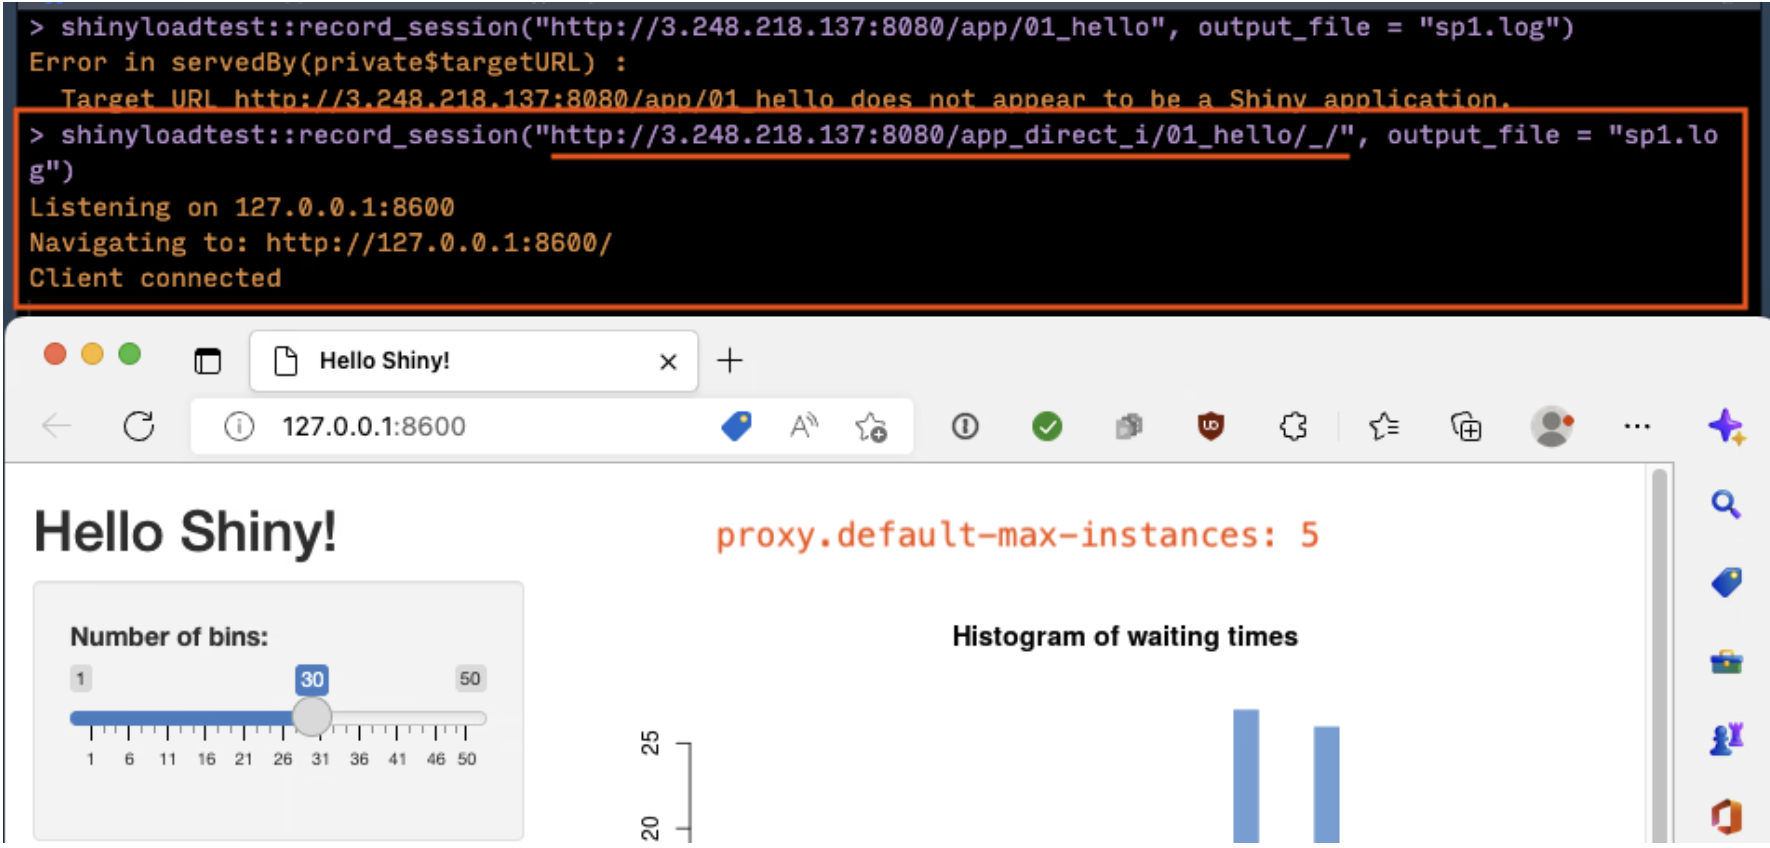
The recording for either case will be the same because they target the same exact URL. Shinycannon is then used to replay this recording to the same target URL.
This shows that proxy.default-max-instances will not affect the test results. We are recording using the same direct target URL and playing back on the same direct target URL.
For thoroughness, a user running a second app instance creates a new <iframe> target path for the second instance:

iframe path of a second app instance.
This is now different from the original <iframe> target path even if it calls the same docker container image. Running shinycannon with this target URL will produce the same results.
