Shiny for Python: How to Create and Style a Custom Module


Think of Shiny for Python custom modules as reusable components. You write the logic once, make it as tweakable as possible, and then reuse it throughout your application. As it turns out, creating custom modules in Shiny for Python is simple enough, but there are some new concepts you need to be aware of.
After reading this article, you'll have a clear picture of how to create a custom Shiny for Python module. We'll show you two examples of different complexities, and these should be enough for you to utilize custom modules in your projects.
But wait, what is Shiny for Python? Read our official introduction guide to find out.
Table of contents:
- Why Would You Create a Custom Shiny for Python Module?
- Example #1 - A Custom Styled Article Card
- Example #2 - Programming Joke Generator
- Summing up Shiny for Python Custom Module
Why Would You Create a Custom Shiny for Python Module?
It's harder to come up with a list of drawbacks when it comes to custom modules since there are so many advantages. Here are some benefits behind them and why they're generally considered good practice:
- Modularity and reusability - A custom Shiny for Python module will allow you to break down your application into smaller units. You can then reuse these modules across different parts of your applications, saving you a lot of development time and simultaneously improving UI/UX consistency.
- Easier code maintainability - Custom modules allow you to separate your code into smaller chunks that are easier to read, understand, debug, and modify. You can make sure a bug fix will propagate through the application without affecting other parts, which results in better maintainability in the long run.
- Ease of collaboration - If you split your application into smaller, modular chunks, this means different team members will be able to work on different modules at the same time. As a result, this will reduce conflict and development time, since every developer can focus on their task, without interfering with yours.
- Consistency and standardization - A custom Shiny for Python module will define a set of reusable components with the same styles, behaviors, and functionality. This means they will create a consistent user experience and simplify maintenance down the road.
- Scalability and flexibility - A modular application means you can add or remove functionality from the application without affecting the entire system. Think about it - you can work on your module, add certain features, and rest assured it won't make an impact on the app behavior overall.
While the advantages are clear, there are a couple of challenges to consider:
- Code fragmentation - When going one step further and splitting your project into multiple repositories, maintaining these separate codebases can become more complex. You might need to apply changes to both the main application and the custom module, leading to extra overhead in coordination and deployment.
- Non-locality of changes - A small feature or visual tweak might require edits across different files, such as a CSS file and the corresponding source code. This can increase the review effort, requiring the modification of multiple files just to implement a single cohesive change. Style.css is very often well justified, but good engineers remember about this idea.
Convinced yet? Good, let's get practical next. In the following section, you'll learn how to create a simple reusable card component.
Example #1 - A Custom Styled Article Card
You'll now get your hands dirty coding a Shiny for Python custom module. It will be a simple one - just a wrapping div that mimics the card element. We'll make it customizable by setting dynamic values to the text elements.
To start, create the following directory structure:
workdir
├── app.py
├── shiny_custom
│   └── card.py
└── www
The www folder will be used for styles later, so don't worry about it yet. The shiny_custom folder contains card.py, which will contain the logic of our custom module. The folder/file names are arbitrary, and you're welcome to come up with yours.
The whole magic happens in card.py, so let's shift our focus there.
This file needs to implement its own ui() and server() functions, decorated with @module.ui and @module.server decorators. We'll only need the UI part here, but it's a good practice to include both.
The card_ui() function will return a div with three HTML elements, all of which have dynamic values from the function parameters. Here's the code:
#card.py
from shiny import module, ui


@module.ui
def card_ui(title: str, text: str, button_url: str):
    # Card element
    return ui.div(
        ui.h2(title),
        ui.p(text),
        ui.a("Read more", href=button_url, target="_blank")
    )


# The server function does nothing
@module.server
def card_server(input, output, session):
    pass
Now head over to app.py and import your custom module. You can call the card_ui() function and pass in the values for the parameters. Shiny for Python also requires you to use specify the value for the id parameter, which is tied to the UI component, and has nothing to do with our custom module.
For the contents of the cards, we'll link a couple of our previous Shiny for Python articles:
from shiny import App, ui
from shiny_custom.card import card_ui, card_server


app_ui = ui.page_fluid(
    card_ui(
        id="article1",
        title="Introducing Shiny for Python - R Shiny Now Available in Python",
        text="Shiny used to be R-exclusive - not anymore! Shiny for Python (Py Shiny?) is now available, and here's a detailed introduction.",
        button_url="https://appsilon.com/shiny-for-python-introduction/"
    ),
    card_ui(
        id="article2",
        title="R Shiny vs Shiny for Python: What are the Key Differences",
        text="Shiny, an R-exclusive web framework is now available in Python. How do they compare? Find out in this detailed R Shiny vs. Shiny for Python comparison.",
        button_url="https://appsilon.com/r-shiny-vs-shiny-for-python/"
    ),
    card_ui(
        id="article3",
        title="Shiny for Python and SCSS: How to Style Your Dashboards with SASS",
        text="Modernize your dashboards with Shiny for Python SCSS - Syntactically Awesome Style Sheets",
        button_url="https://appsilon.com/shiny-for-python-scss/"
    ),
    card_ui(
        id="article4",
        title="Shiny for Python: How to Work With MySQL and Postgres Databases",
        text="CSV data is quick and fun, but real-world data is often stored in databases. Learn how to access MySQL and Postgres in this Shiny for Python Databases guide.",
        button_url="https://appsilon.com/shiny-for-python-databases-mysql-postgres/"
    )
)

def server(input, output, session):
    pass


app = App(ui=app_ui, server=server)
As you can see, the main server() function does nothing once again since there isn't any logic going on.
You can run the application from the Terminal by running the following command:
shiny run app.py
Now open your localhost on port 8000 - here's what you will see:
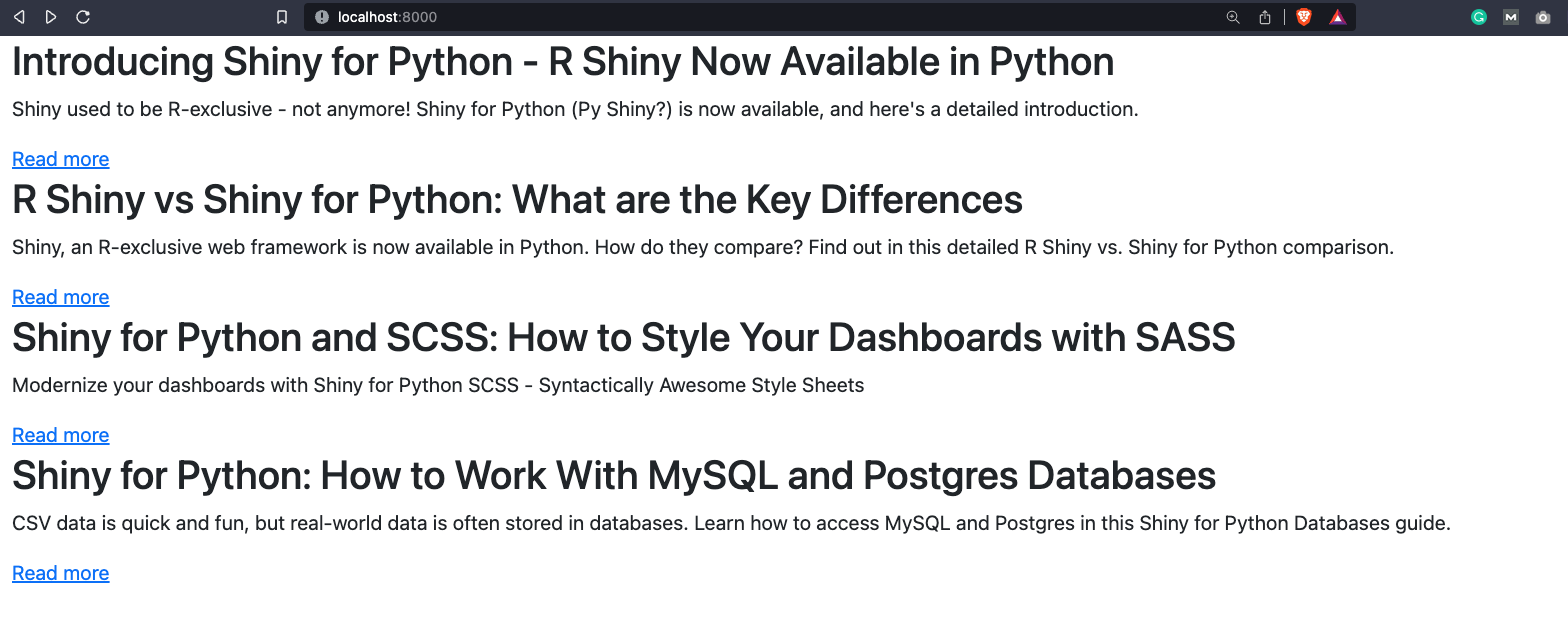
Our custom Shiny for Python module definitely works, but it needs some tweaking. Let's introduce CSS next.
How to Style Your Shiny for Python App
Remember the www folder created in the previous section? Create a new file inside it - main.css and paste the following code:
@import url('https://fonts.googleapis.com/css2?family=Poppins:wght@400;700&display=swap');

* {
  margin: 0;
  padding: 0;
  box-sizing: border-box;
}

body {
  font-family: 'Poppins', sans-serif;
  background-color: #f4f4f4;
  padding: 1rem 0;
}

.container {
  display: flex;
  justify-content: space-evenly;
  align-items: center;
  gap: 2.5rem;
}

.card {
  padding: 1rem 1.25rem;
  margin-bottom: 1rem;
}

.card > h2 {
  font-weight: 700;
  font-size: 1.5rem;
}

.card > p {
  font-size: 0.9rem;
  font-style: italic;
}

.card > a {
  text-decoration: none;
  border: 2px solid #0099F8;
  background-color: #0099F8;
  color: #ffffff;
  padding: 0.5rem 0.75rem;
  transition: all .2s;
}

.card > a:hover {
  background-color: #ffffff;
  color: #0099F8;
}
These styles will modify how the app looks and will also add some nice hover elements on the button.
Ready to take your styles to the next level? Try SCSS in Shiny for Python - you won't look back.
We still need a way to connect these styles both to app.py and to the custom module.
For the module, simply add the class_="card" attribute at the end of the div, just as shown below:
from shiny import module, ui


@module.ui
def card_ui(title: str, text: str, button_url: str):
    return ui.div(
        ui.h2(title),
        ui.p(text),
        ui.a("Read more", href=button_url, target="_blank"),
        class_="card"
    )


@module.server
def card_server(input, output, session):
    pass
Things are a bit more complex in app.py. You'll first have to point to the main.css file by adding it to the head tag, and then rearrange the UI into a couple of container divs. Of course, you also need to link the static assets directory - that's where Python's pathlib module comes in handy.
Overall, this is how your app.py file should look like:
from shiny import App, ui
from shiny_custom.card import card_ui, card_server
from pathlib import Path


app_ui = ui.page_fluid(
    ui.tags.head(
        ui.tags.link(rel="stylesheet", href="main.css")
    ),
    ui.tags.div(
        ui.tags.div(
            card_ui(
              id="article1",
              title="Introducing Shiny for Python - R Shiny Now Available in Python",
              text="Shiny used to be R-exclusive - not anymore! Shiny for Python (Py Shiny?) is now available, and here's a detailed introduction.",
              button_url="https://appsilon.com/shiny-for-python-introduction/"
            ),
            card_ui(
                id="article2",
                title="R Shiny vs Shiny for Python: What are the Key Differences",
                text="Shiny, an R-exclusive web framework is now available in Python. How do they compare? Find out in this detailed R Shiny vs. Shiny for Python comparison.",
                button_url="https://appsilon.com/r-shiny-vs-shiny-for-python/"
            ),
            class_="row"
        ),
        ui.tags.div(
            card_ui(
                id="article3",
                title="Shiny for Python and SCSS: How to Style Your Dashboards with SASS",
                text="Modernize your dashboards with Shiny for Python SCSS - Syntactically Awesome Style Sheets",
                button_url="https://appsilon.com/shiny-for-python-scss/"
            ),
            card_ui(
                id="article4",
                title="Shiny for Python: How to Work With MySQL and Postgres Databases",
                text="CSV data is quick and fun, but real-world data is often stored in databases. Learn how to access MySQL and Postgres in this Shiny for Python Databases guide.",
                button_url="https://appsilon.com/shiny-for-python-databases-mysql-postgres/"
            ),
            class_="row"
        ),
        class_="container"
    )

)

def server(input, output, session):
    pass


www_dir = Path(__file__).parent / "www"
app = App(ui=app_ui, server=server, static_assets=www_dir)
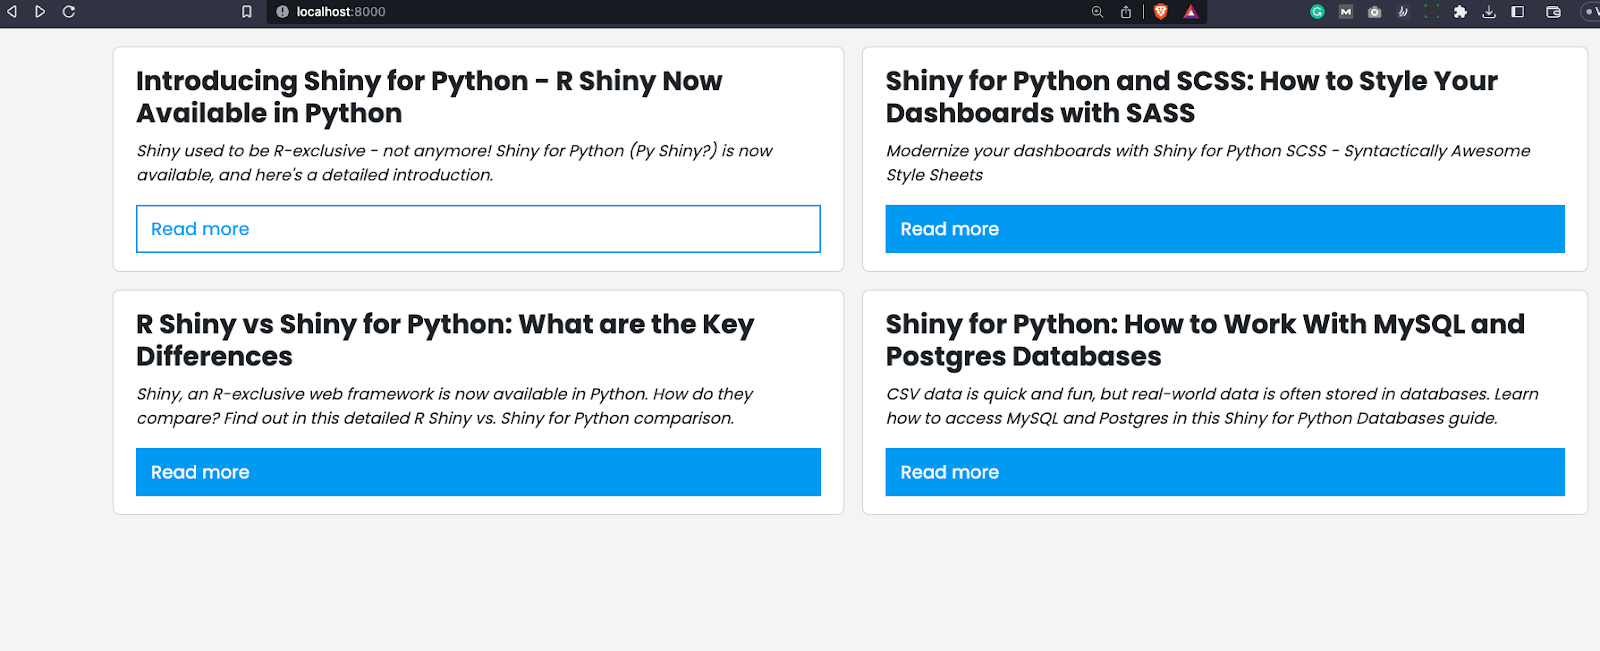
You can now refresh the application - here's what you should see:
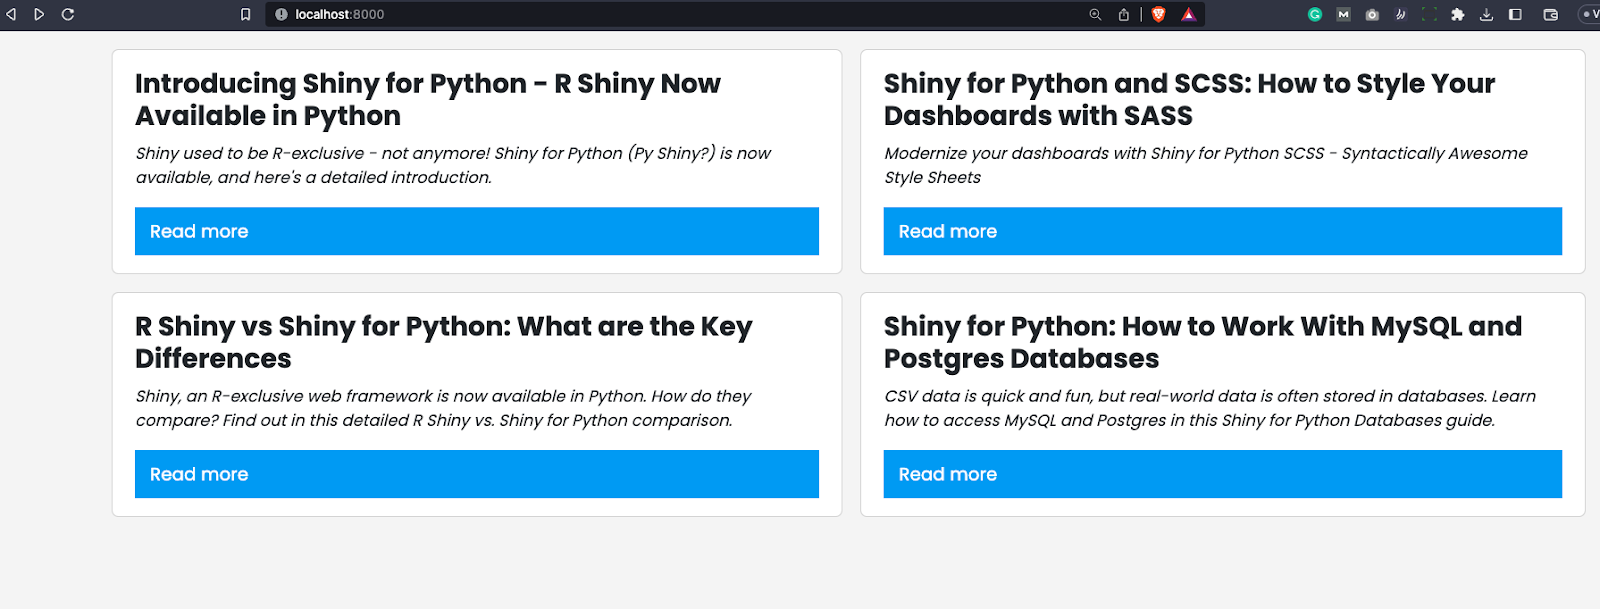
It looks like a real app now made of reusable components. There's also a style modification happening when you hover over the "Read more" button:
This was simple, wasn't it? Let's complicate things slightly with a more capable custom module.
Example #2 - Programming Joke Generator
We're now going to spice things up a bit by creating a Shiny for Python custom module that fetches data from a remote API and displays it. To keep things simple, we'll see an API that generates a Programming joke. It's a silly example but perfectly demonstrates just what's capable with custom modules in Shiny for Python.
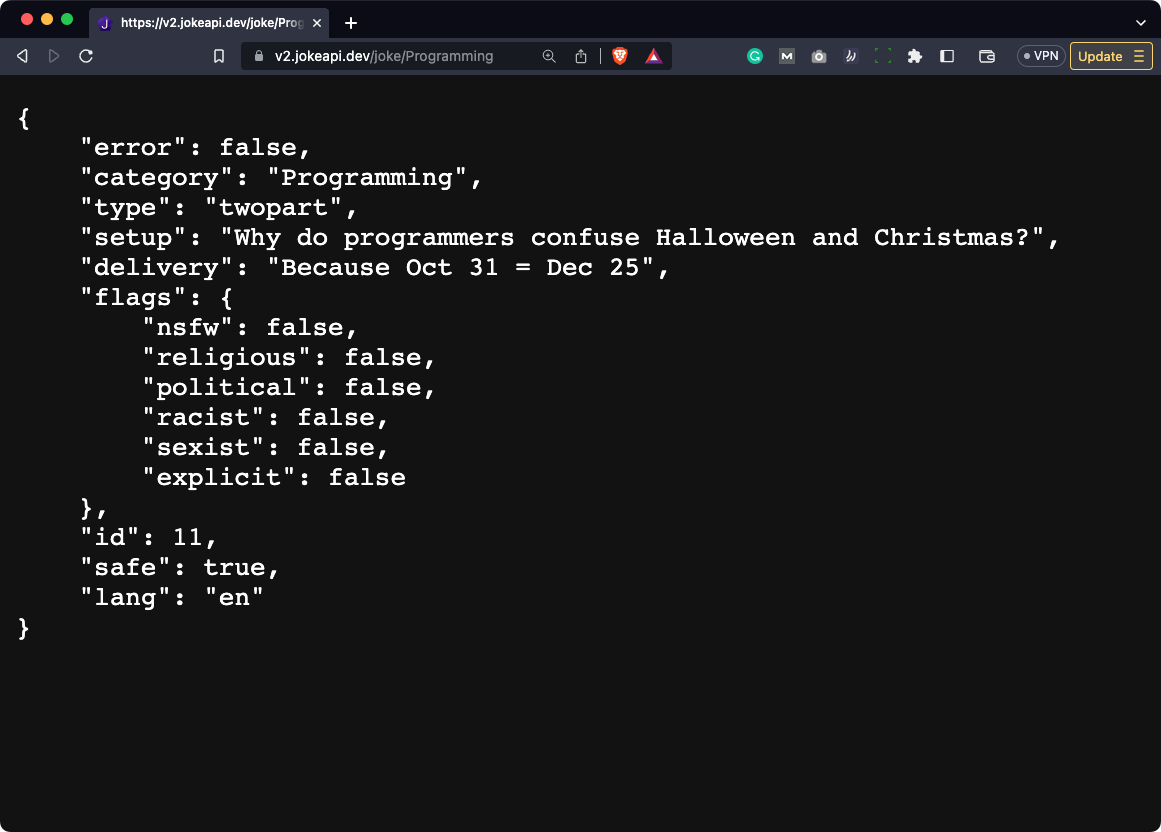
The API can return the joke in two formats, which means we'll have to adjust for that. The first format gives us the joke in the joke field, as shown below:
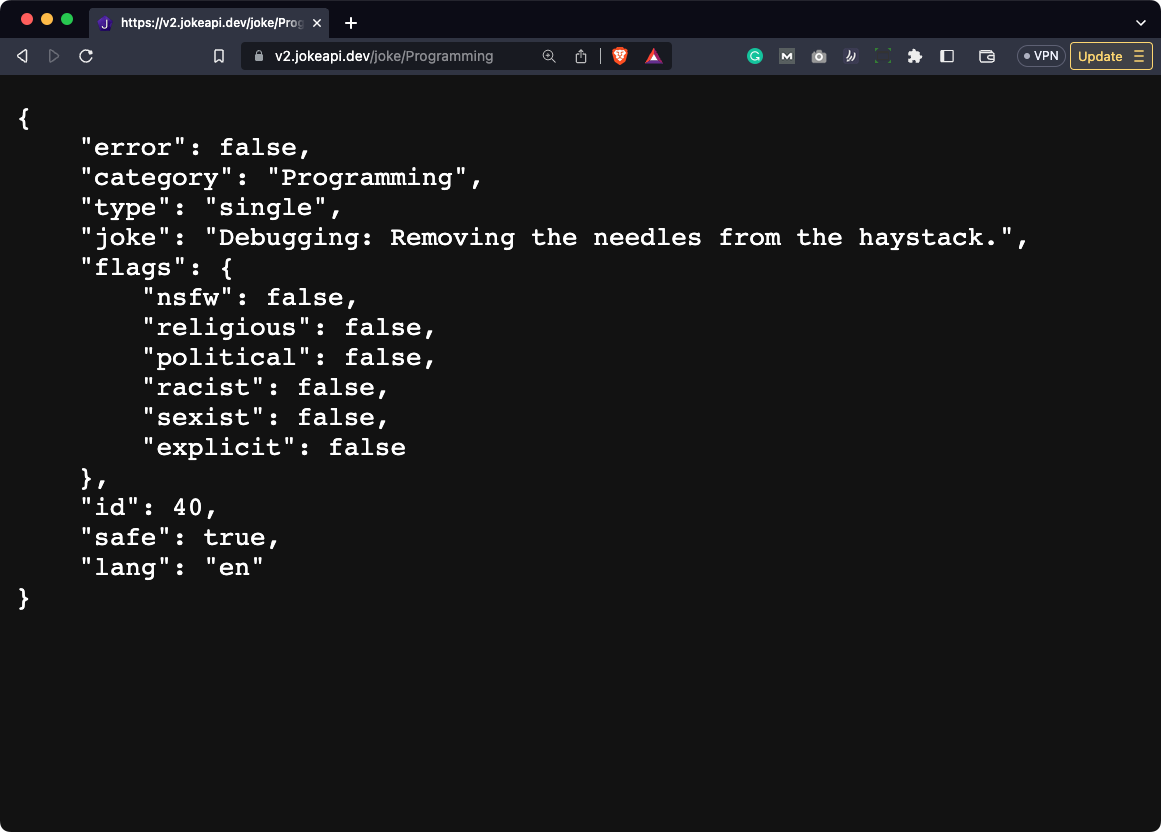
Other times, the joke is split into two parts - setup and delivery. Take a look:
Handling this difference in Python is easy. We'll try to return the joke as the first option, and if that fails, we'll opt for the second one.
Create a new file inside shiny_custom named joke.py. The UI is quite simple, it contains a wrapper div with a heading, an action button, and a text output field. The server() is where the magic happens.
Here's what you need to take into consideration:
- The current joke must be a reactive value.
- You need a function to get the joke, decorated with the
@reactive.Calcdecorator. - Once the button is clicked, you need to set the joke to the one fetched from the API.
- The resulting text output field has to show the joke.
If you prefer code over explanations, here's the entire content of joke.py file:
from shiny import module, ui, render, reactive
import requests


@module.ui
def joke_ui():
    # Simple UI with a button and output text
    return ui.div(
        ui.h2("Give me a programming joke"),
        ui.input_action_button(id="button", label="Generate joke"),
        ui.output_text_verbatim(id="programming_joke"),
        class_="card"
    )


@module.server
def joke_server(input, output, session, starting_joke = "Click on the button to generate a joke!"):
    joke = reactive.Value(starting_joke)

    # This function gets the joke from the API, formats it correctly, and returns it
    @reactive.Calc
    def get_joke():
        endpoint = "https://v2.jokeapi.dev/joke/Programming"
        res = requests.get(endpoint).json()
        try:
            return res["joke"]
        except Exception as _:
            return f"{res['setup']} -- {res['delivery']}"

    # What happens when a button is clicked
    @reactive.Effect
    @reactive.event(input.button)
    def _():
        joke.set(get_joke())

    # Our output text field
    @output
    @render.text
    def programming_joke():
        return joke()
Including it in app.py is straightforward, but this time, you'll need both the UI and the server functions. We'll style the app with a bit of CSS, and you're free to do it as well:
from shiny import App, ui
from shiny_custom.joke import joke_ui, joke_server
from pathlib import Path


app_ui = ui.page_fluid(
    ui.tags.head(
        ui.tags.link(rel="stylesheet", href="style.css")
    ),
    ui.div(
        joke_ui("joke"),
        class_="container"
    )
)

def server(input, output, session):
    joke_server("joke")


www_dir = Path(__file__).parent / "www"
app = App(ui=app_ui, server=server, static_assets=www_dir)
Here's the CSS code:
@import url('https://fonts.googleapis.com/css2?family=Poppins:wght@400;700&display=swap');

* {
  margin: 0;
  padding: 0;
  box-sizing: border-box;
}

body {
  font-family: 'Poppins', sans-serif;
  background-color: #f4f4f4;
  padding: 1rem 0;
}

.card {
  padding: 1rem 1.25rem;
}

.card > #joke-programming_joke {
  margin-top: 1rem;
}
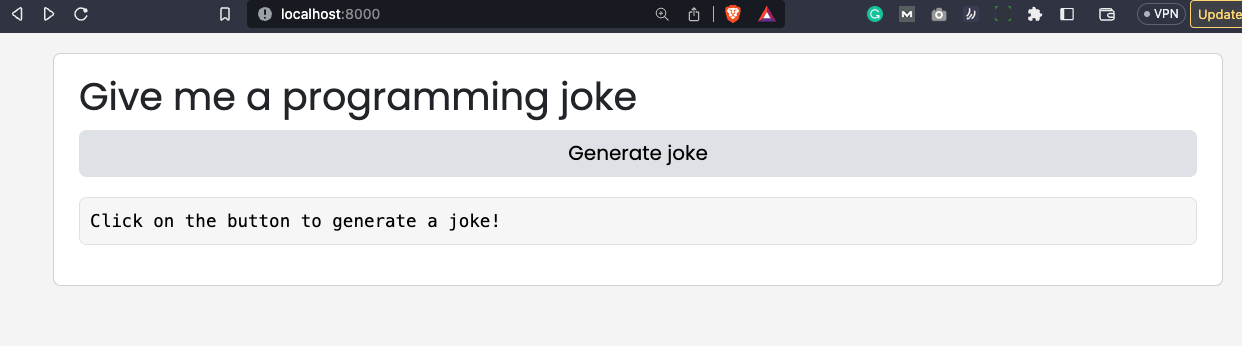
You can now launch the app - here's what you should see:
Clicking on the "Generate joke" button will communicate with the remote API and change the text of the element below the button:
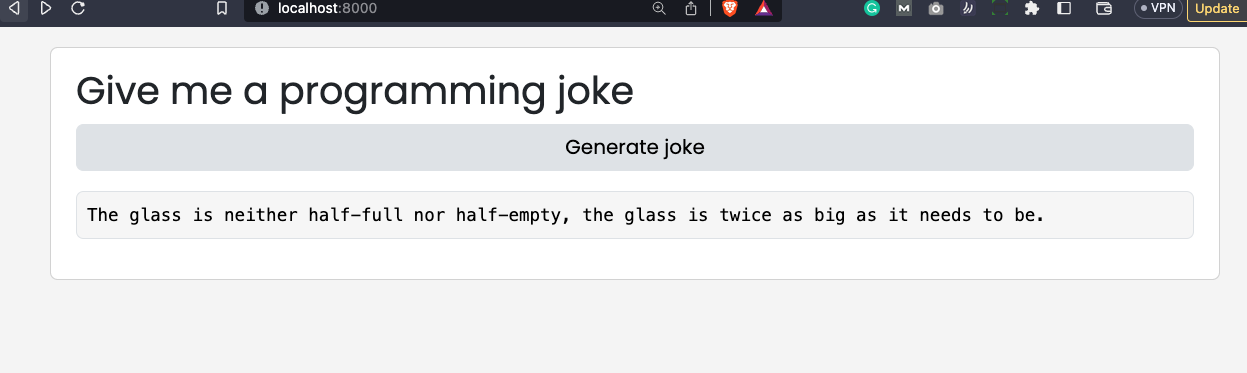
You're almost certain to get a different joke, but that's irrelevant. The important thing is that it works.
Let's make a short recap next.
Summing up Shiny for Python Custom Module
Today you've learned the importance of custom modules in Shiny for Python. You can think of these as reusable components that will make your app modular and more consistent.
We hope you've followed through with the examples - they were somewhat basic, but have demonstrated perfectly how to implement a custom module in Shiny for Python.
Have you used custom modules in Shiny for Python? Do you find them worth the time for small projects? Please share your thoughts and results with us on Twitter - @appsilon. We'd love to see how you've utilized reusable components in Shiny.
How does Shiny for Python differ from R Shiny? We did the research, you do the reading.
.png)